Plugin users
Applying My Plugin
Did you purchase my plugin recently? Thank you. There are a few things you need to know to avoid obstacles when using it. This tutorial shows you the ropes so you can hit the ground smoothly.
Acquiring My Plugin
Please note that my plugin is for Unreal Engine version 5.7, or greater. It will not work in Unreal Engine 5.6 or lower.
- Go to my Patreon at patreon.com/c/u78762934, and subscribe to the backer tier, or above.
- Go to Collections, in my Patreon, and find 1M Lights plugin.
- Find the most recent Plugin related post, and download the attachment with "Download All" button.
Placing the Plugin in a Folder
You have two options to place this in an accessible folder - you can place this in a project folder, where only your project will be able to use it, and any changes you make apply to the project alone, or you can place it in the engine folder, where it will be accessible to all projects running that unreal engine version. Here, any changes will be distributed to all projects using the plugin.
Project level Plugin
- Open your project folder. This can be easily accessed by right clicking your content folder, and pressing Show in Explorer, or Show in Finder.
- Navigate to the root of your project. It should look something like this. If you are missing the plugin folder, shown below, that is normal. You will add that in the next step.
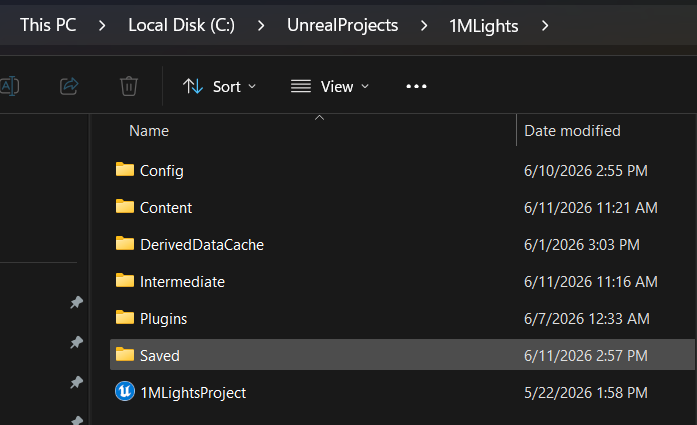
- Next, create a folder here called "Plugins". It must match that name exactly.
- Extract the downloaded 1MLights Plugin. It can be extracted directly to the plugins folder, or extracted elsewhere, and placed in this folder. It should look like this.
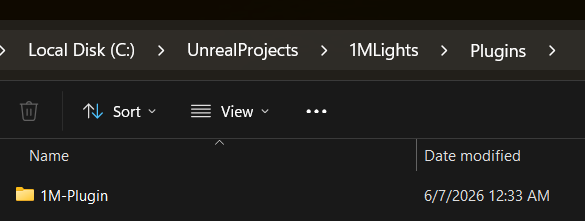
- Start the Unreal Engine project you placed the plugin into.
- You may need to enable the plugin from Unreal Engine. This can be done by going to Edit > Plugins > 1MLights and ticking Enable. Then restart the project. If it's already enabled, you do not need to do this.
- To view the plugin content, you must click on the gear settings icon in your content browser, and check plugin content.
- Now, you should have access to my plugin content.
Engine level Plugin
Installing at the engine level makes the plugin available to every project running that engine version, with no per-project copies to manage.
- Close Unreal Engine if it is running.
- Find your engine install directory. On Windows, the default is
C:\Program Files\Epic Games\UE_5.7. If you installed the engine somewhere else, you can confirm the location in the Epic Games Launcher under Library. - Inside that directory, navigate to Engine > Plugins.
- Create a folder there called Marketplace, if one does not already exist. This is the conventional home for third-party plugins, and keeps them separate from the plugins that ship with the engine.
- Extract the downloaded 1MLights Plugin into that Marketplace folder, the same way as the project-level install.
- Launch any project on that engine version. If the plugin is not active, enable it from Edit > Plugins > 1MLights and restart — just like the project-level install.
- As before, check Plugin Content under the content browser's gear settings icon to see the plugin content.
Warning: at the engine level, any change you make to the plugin content persists between projects. The engine folder holds the one and only copy of the plugin, and every project on that engine version reads from it. Edit a fixture Blueprint while working in one project, and every other project sees the modified version. If you need to customize plugin content for a single project, either install the plugin at the project level instead, or duplicate the asset into that project's own Content folder and modify the copy.
Adding a Fixture
First, go to your Plugins folder, then 1M Lights > Fixtures, and look for the fixture you would like to add.
Note that I do not have every fixture yet, and probably never will have every fixture. If you would like a fixture added, please send me a message through this website, by email, or on Discord, and I can put it on my list. If you need a fixture as soon as possible, a fee will be applied.
- Find the Blueprint of that fixture. It will be labeled
BP_FixtureName. - Drag that Blueprint from the Content Browser into your level.
- In the Details panel — usually on the right side of the UI — find the variable called Mode and set the fixture to the mode you would like. This can also be done after you patch the fixture in Unreal Engine.
Setting Up Your 1M DMX Library
Go to Plugins > 1M System > DMX Library and look for 1M_Library. In order to use my fixtures, you must be using my library — particularly with multi-instance fixtures.
A Note on MVR Imports
If you are importing an MVR, do not use the fixture library or the pre-made fixtures that the MVR importer creates. They will never work. I have a separate tutorial to explain this, but essentially the MVR importer can place the fixtures mostly correctly, but it cannot set up the patch correctly. You will need to do the patch manually.
Building Your Patch
- Duplicate 1M_Library by pressing Ctrl + D.
- Open this new library by double-clicking it.
- Go to Fixture Patch and clear that patch completely. You can click on any fixture in the patch, press Ctrl + A, then Delete, to delete everything. Note that the fixtures that come patched are purely for the demo levels and are not needed for any functionality you are setting up.
- Click Add Fixture, and enter the fixture type, quantity, mode, and starting address for these fixtures.
Configuring DMX Input
Once you are complete, go to Edit > Project Settings and scroll down near the bottom to find the DMX settings.
Here, you can choose between taking Art-Net in, taking sACN (Streaming ACN) in, and the number of universes you are accepting. Configure this correctly.
Ensure that in your console, you are sending the correct sACN or Art-Net settings.
Open the DMX Activity Monitor from the DMX dropdown menu. Here, you should be able to see your DMX stream coming in.
Patching Your Fixtures
Lastly, select the fixtures that you dragged into your level and set their fixture patch. There are three ways to do this.
Method 1 — Address Incremental. Select your fixtures in the order you would like to patch them. Open the DMX dropdown menu and press DMX Patch Tool. Here, you can select your DMX library and your starting fixture — ensure that you are using the correct DMX library. Press Address Incremental. This will take the order in which you selected your fixtures and match their patch to the order of your fixture patches, descending from the fixture patch that you selected.
Method 2 — Address Same. With your fixtures selected in the DMX Patch Tool, press Address Same, and all of the selected fixtures will be assigned to the fixture patch that you selected.
Method 3 — Details panel. After selecting your fixtures, scroll down in the Details panel and simply assign them a DMX library and a fixture patch.
At this point, you should be able to control your fixtures right in the editor. You do not need to enter Play Mode in order to control your fixtures.
If you cannot control your fixtures in the editor, go back to the DMX project settings and ensure that the Receive DMX in Editor box is checked.
Using Fixtures with the Unreal Engine DMX Control Console
Using the Unreal Engine DMX Control Console is a great way to control your fixtures for a simple pre-visualization, without any attached hardware or sACN / Art-Net source.
One thing to note — and I will mention this twice — is that you can store a Cue on the right side of the Control Console and recall it, but as soon as you change a library, your Cue will be deleted.
Configuration
When using the DMX Control Console, you are effectively generating your own sACN or Art-Net source, outputting it through the output ports determined in your project settings, and receiving that same signal through an input port in your project settings, where it goes into your fixtures.
- Go to Project Settings > DMX, and ensure that you have an output port going to an active network, and an input port coming from that same active network.
- If you are working on a laptop that is not connected to any network, the most efficient way to do this is to output to the
127.0.0.1IP address, and input from that same127.0.0.1IP address.
Operating the Console
- You can hold Shift and select many fixtures; this will group all of them together.
- If your fixture is not turning on but can pan and tilt, it is likely that the shutter parameter is in the wrong place and a default has not been set. You can adjust this in the fixture profile, but to turn the fixture on you must adjust the shutter attribute.
- If the fixture does not turn on, ensure that it is getting red, green, or blue values. If you are using cyan, magenta, and yellow mixing, ensure that all three colors are not set to full.
- You can double-click a parameter and it will select all of the faders that match that attribute's name. This is useful for multi-instance fixtures where you want to control the entire group of instances and dial them in later.
Storing Cues
To store a cue, click the plus icon on the right side of the Control Console. This automatically stores the present output into that cue. Changing any output will un-grey the arrows and allow you to update the data stored in that cue. If you right-click on the cue and hit Recall, it will bring back that cue.
As a reminder: you can store a Cue on the right side of the Control Console and recall it, but the moment you change a library, your Cue will be deleted.