Unreal Engine DMX Plugin Fundamentals
This tutorial teaches the fundamentals of what Epic Games had in mind when they created the Unreal Engine DMX plugin. It is intimidating at first, but a few core concepts come together to create a reasonable amount of predictability.
Getting Started
Welcome to the Unreal Engine DMX Plugin tutorial. This tutorial will cover as much of the plugin as possible, but first — let's get it set up.
There are two ways to get the DMX Plugin running in your project:
- Open the DMX Template when creating a new project. This is covered in the Lighting Designer to Unreal tutorial.
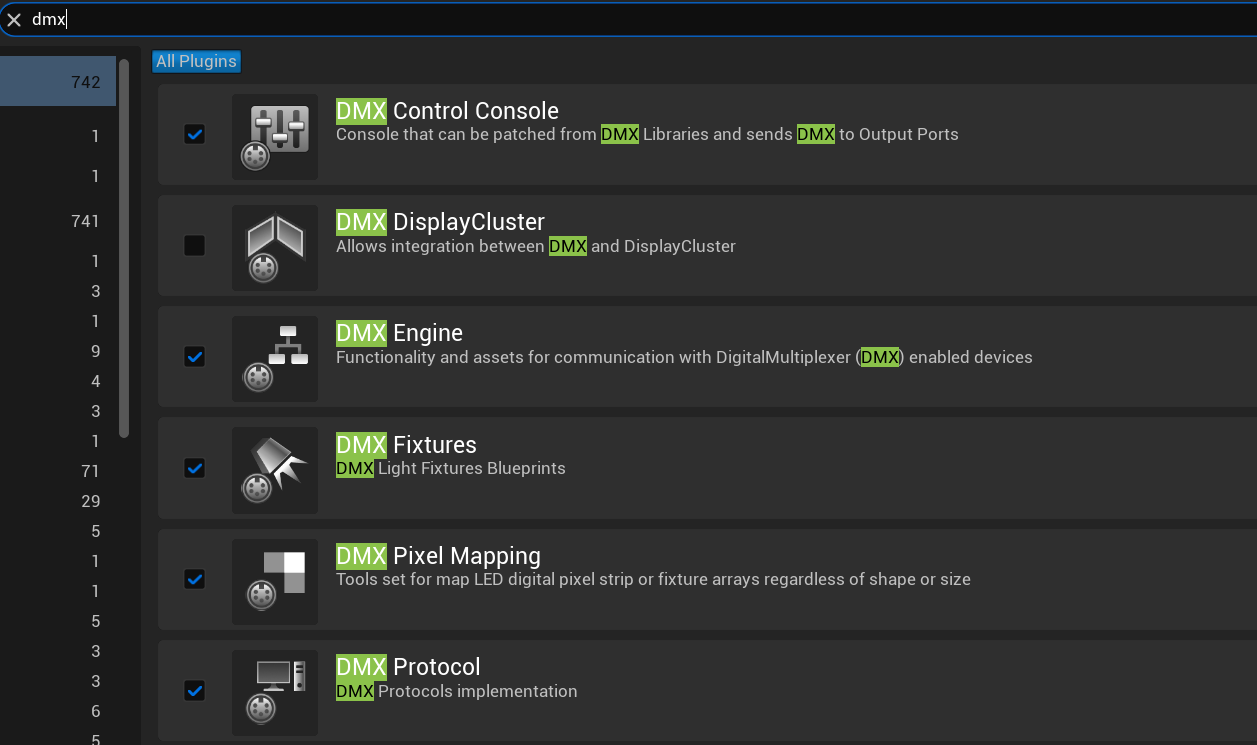
- Enable the plugin manually in an existing project and restart. Navigate to Edit > Plugins and search for DMX.
You will need the following plugins enabled:
- DMX Control Console
- DMX Engine
- DMX Fixtures
- DMX Protocol
DMX Pixel Mapping is shown in the screenshot below, but it is an accessory and not required to get started.
With those plugins enabled and the project restarted, you are ready for implementation.
The DMX Dropdown
On the top menu bar you will see a dropdown labeled DMX with a small DMX plug icon. We will refer to this as the DMX Dropdown throughout this tutorial.

DMX Plugin Content
The source of the DMX plugin content can be found in the directory folder view on the left side of the Content Browser. The only folder you need to concern yourself with is Engine/Plugins/DMXFixtures. Everything else in that area is behind-the-scenes material — mostly C++ classes.
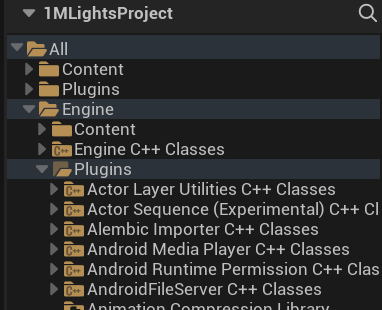
The DMXFixtures folder is not shown in this screenshot, but scrolling down will reveal it. Right-click it and select Add to Favorites for quick access.
Do not modify content inside your plugin folder unless you are certain the change should apply to every project. Engine plugin content is shared across all projects on your machine. The safer approach is to drag the Blueprint you want to modify into your own Content folder and modify that copy instead.
DMX Signal Flow
The following steps illustrate how a DMX signal travels from your console to a fixture in Unreal Engine. Each block represents a stage in that chain.

DMX Signal
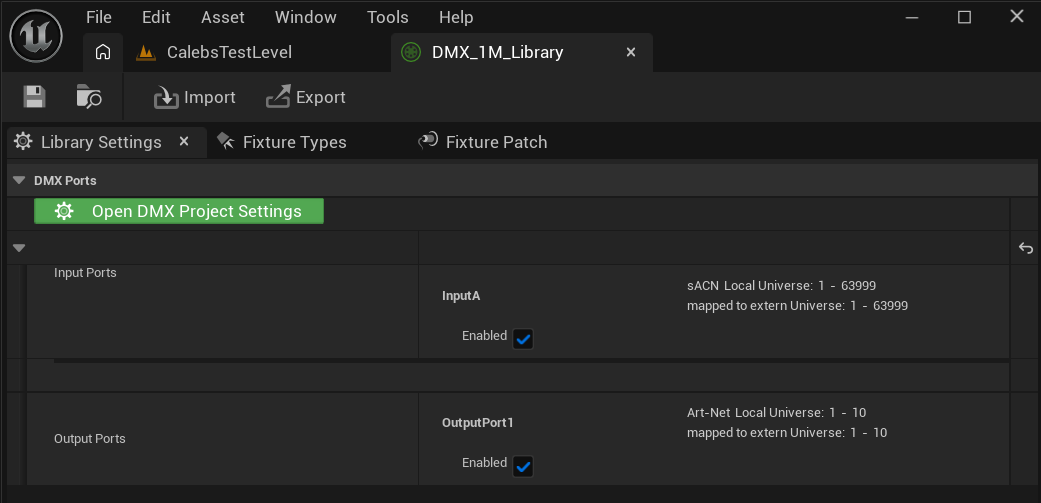
The first step to this is acquiring the DMX signal. This is obtained through the DMX input ports through Art-Net or sACN, and configured in Project Settings / DMX / Input Ports.
It may be a good idea, when starting, to delete all but 1 input port.

Activity Monitor
Once you configure DMX input, you can verify you are seeing DMX by opening the DMX Dropdown and opening the DMX Activity Monitor or the DMX Channel Monitor.
You are shown a list of universes that are being received, with the universe number appearing on the left side.
To the right of each universe are the values it is receiving — but only the values over 0. Note that if you have dimmer channels patched and their values are at 0, they will not be shown until their value is changed to over 1.
An Array is a collection of the same variable type stored as one — like a numbered list. A Map pairs each entry with a unique key so data can be looked up by name or ID rather than position.
The DMX Library can be imagined as a sorting and packaging device. It has three primary functions.
1. Receives Raw DMX
The library takes in the raw DMX signal — the array of universes and channel values seen in the Activity Monitor.
2. Stores a Fixture Database
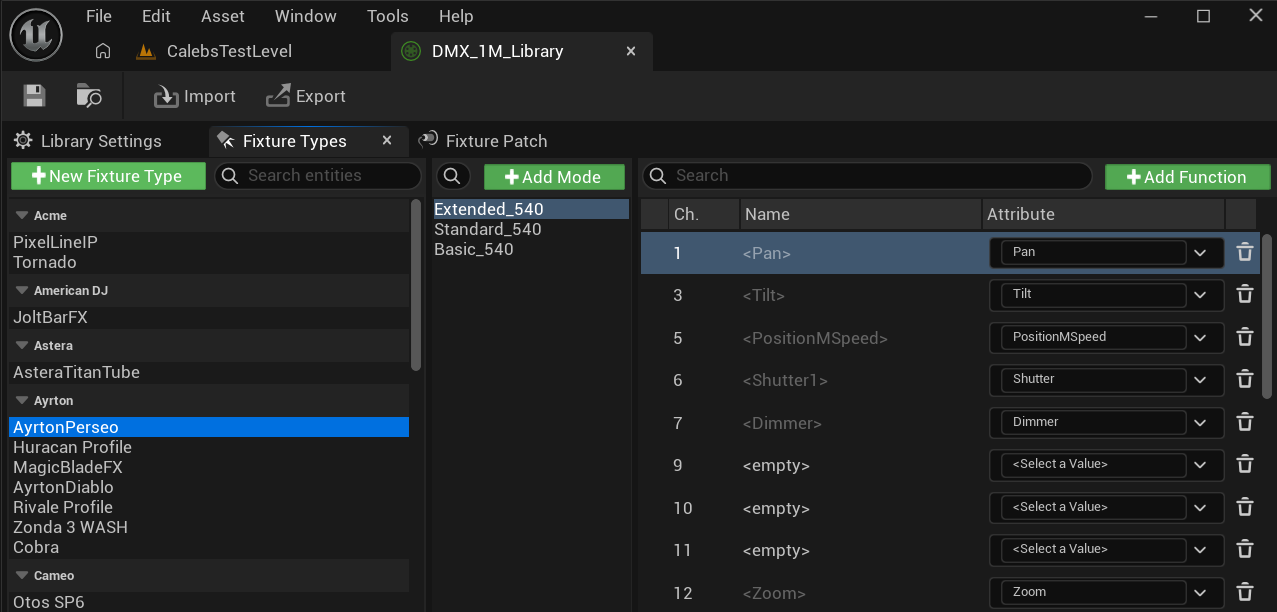
The library holds a database of fixture types. Each fixture type has various modes, and each mode has a list of attribute names — or a repeating matrix of attribute names (matrices are commonly used in multi-instance fixtures) — each positioned at a channel offset.
Using the offset and the fixture's start address gives any fixture everything it needs to read an entire DMX universe and use only the data relevant to itself, mapping each channel to the correct function within the fixture. This channel position is called an offset in GDTF terminology.
3. Contains the Patch
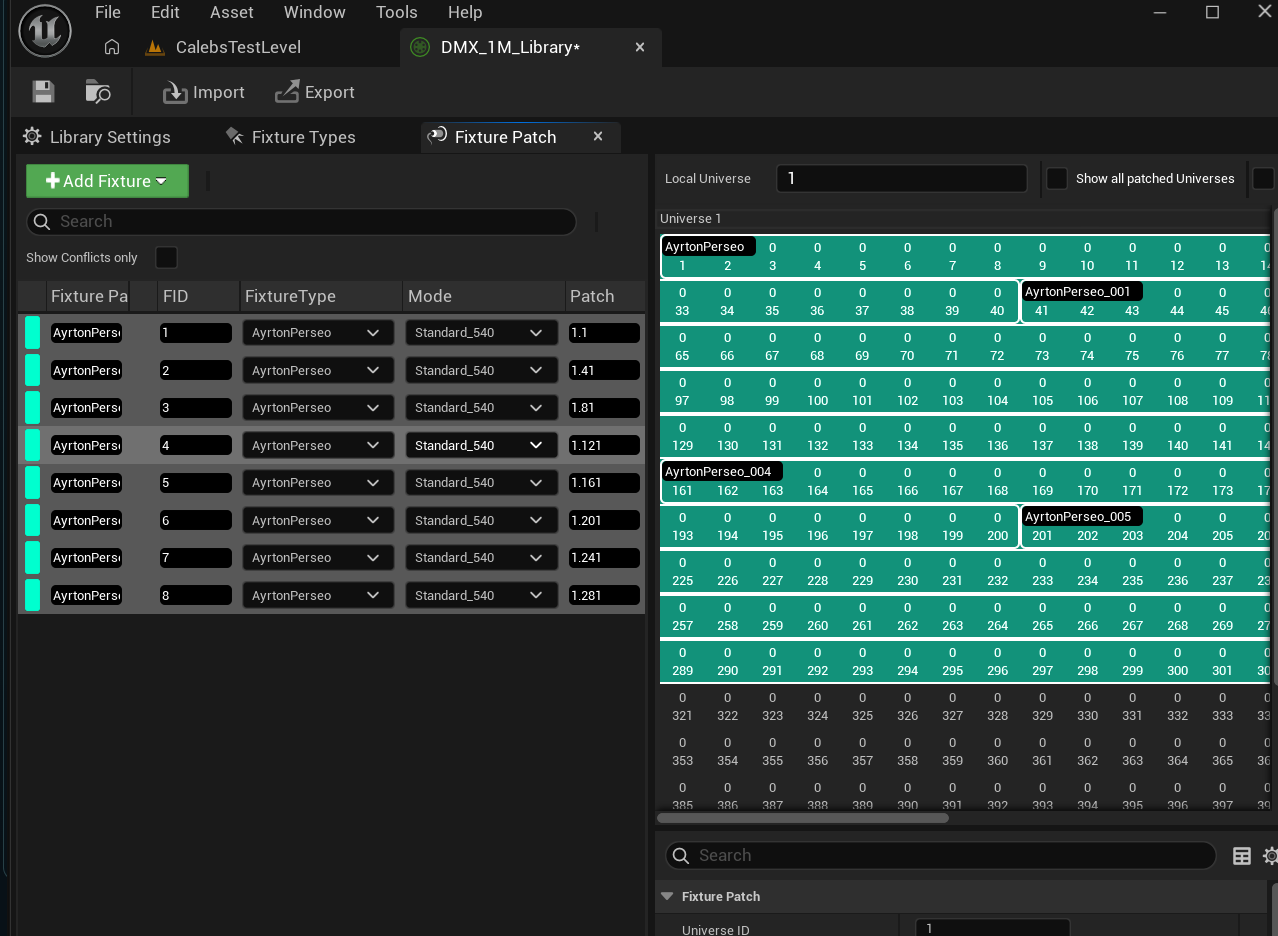
The DMX Library also holds a patch, which creates Fixture Patches — each with a unique name and fixture ID, a fixture type, a mode, and most importantly, a universe and start address.
In this context, a Fixture Patch is a noun — it is an object that will be assigned to an actual fixture in your level. It carries a critical piece of data: an attribute value map.
This is the packaging step. The DMX Library reads each DMX value assigned to a fixture's channels, finds which attribute name corresponds to each channel, and assembles a list of attribute names paired with their current values. It then sends that package to whatever fixture in the level is assigned to that patch.
This way, each fixture receives only the information needed to alter its parameters exactly the way the lighting programmer intended.
What Happens When the Patch Is Off?
Imagine that either the lighting console's patch for a fixture, or Unreal Engine's patch for a fixture, is off by just one channel.
The DMX Library would still look for DMX values at the channels specified by its patch, but would be pulling incorrect values and packing them in the order defined by the attribute list. So if Pan was supposed to be 128, Tilt 20, and Dimmer 255 — now Pan is 20, Tilt is 255, and Dimmer is whatever number happened to be next to it.
Think of the DMX Library as a meal kit robot, and the fixture as the person cooking at home. A mispatch means the right ingredients arrive in the wrong quantities — and the recipe fails.
There are two types of maps for standard attribute names: Normalized, which ranges the value from 0–1, and Non-Normalized, which ranges from 0–255, or 0–65535. Normalized maps are better for driving Blueprint logic. Non-Normalized are better for looking specific values up on a data table.
The third data type is a Matrix Value Map, which we will cover later.
Handling the Attribute Map
There are two methods to handle the incoming attribute maps from the DMX Library. The first is through add components, which pull their own specified attribute names and corresponding values from the attribute map. They also pull certain components from the fixture — such as the head, yoke, beam material, light, light material, lens, and lens material — and alter those items on behalf of the fixture the component is attached to.
Sometimes, the only thing needed from the hosting fixture is to run one function called Update Component.
Blueprint Logic: Moving Head
Let's take a look at the logic on a typical moving head, straight from the engine content.
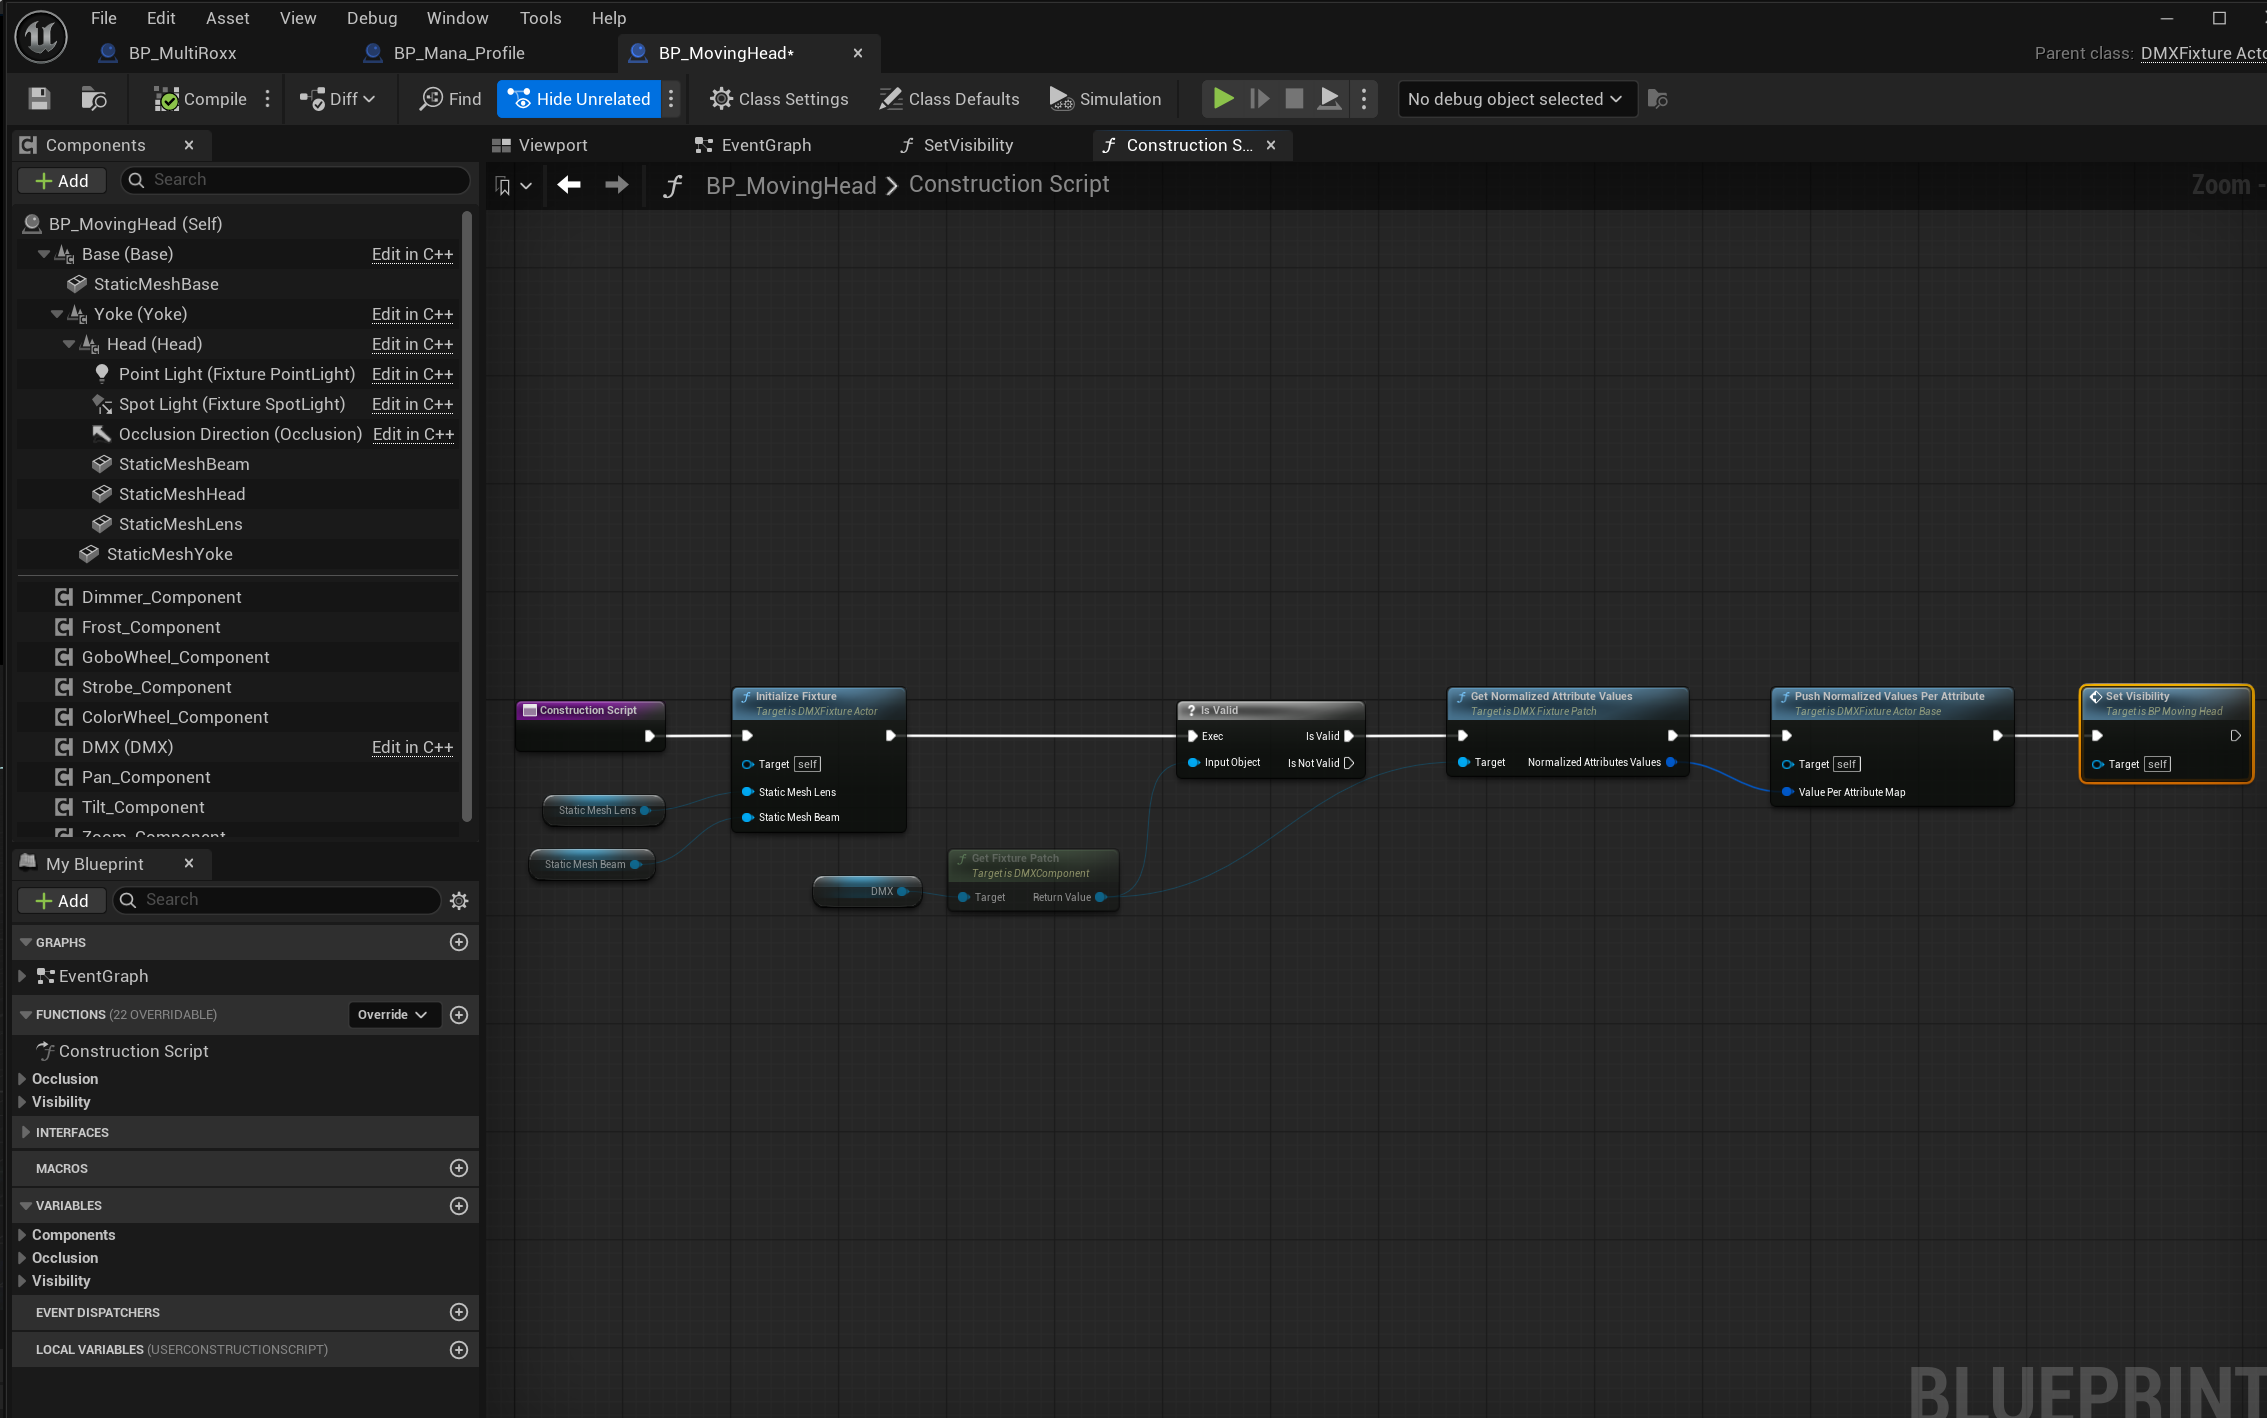
On the left we can see the various components that make up this Blueprint: Dimmer, Frost, GoboWheel, Strobe, ColorWheel, Pan, Tilt, and Zoom — and most importantly, the DMX component, which holds the fixture patch and drives runtime logic while in the editor. Thank you, Epic Games, for that feature.
The Construction Script
The Blueprint logic shown is in the Construction Script. It runs once, every time the fixture is modified in the editor. Think of it as a setup script. Here is what each step does:
- Initialize Fixture — This is a C++ component, so the exact internals are not fully visible, but from experience: it takes the lens, creates a Dynamic Material Instance (from here on called a MID) from its material and assigns it to the lens, does the same for other mesh components, and performs additional underlying preparation.
- Is Valid — If the fixture patch is valid and exists, it retrieves the normalized attribute value map and pushes those attribute values to the destination components. The responsible components are likely also determined inside the Initialize Fixture node, but this will be updated once confirmed.
- Set Visibility — This reads default booleans on the fixture — such as Disable Lights — and sets the visibility of the light accordingly. It also disables the beam and light if the dimmer value is at 0.
On DMX Component Tick
There are two event pins that fire from the DMX component: On DMX Component Tick and On Fixture Patch Received.
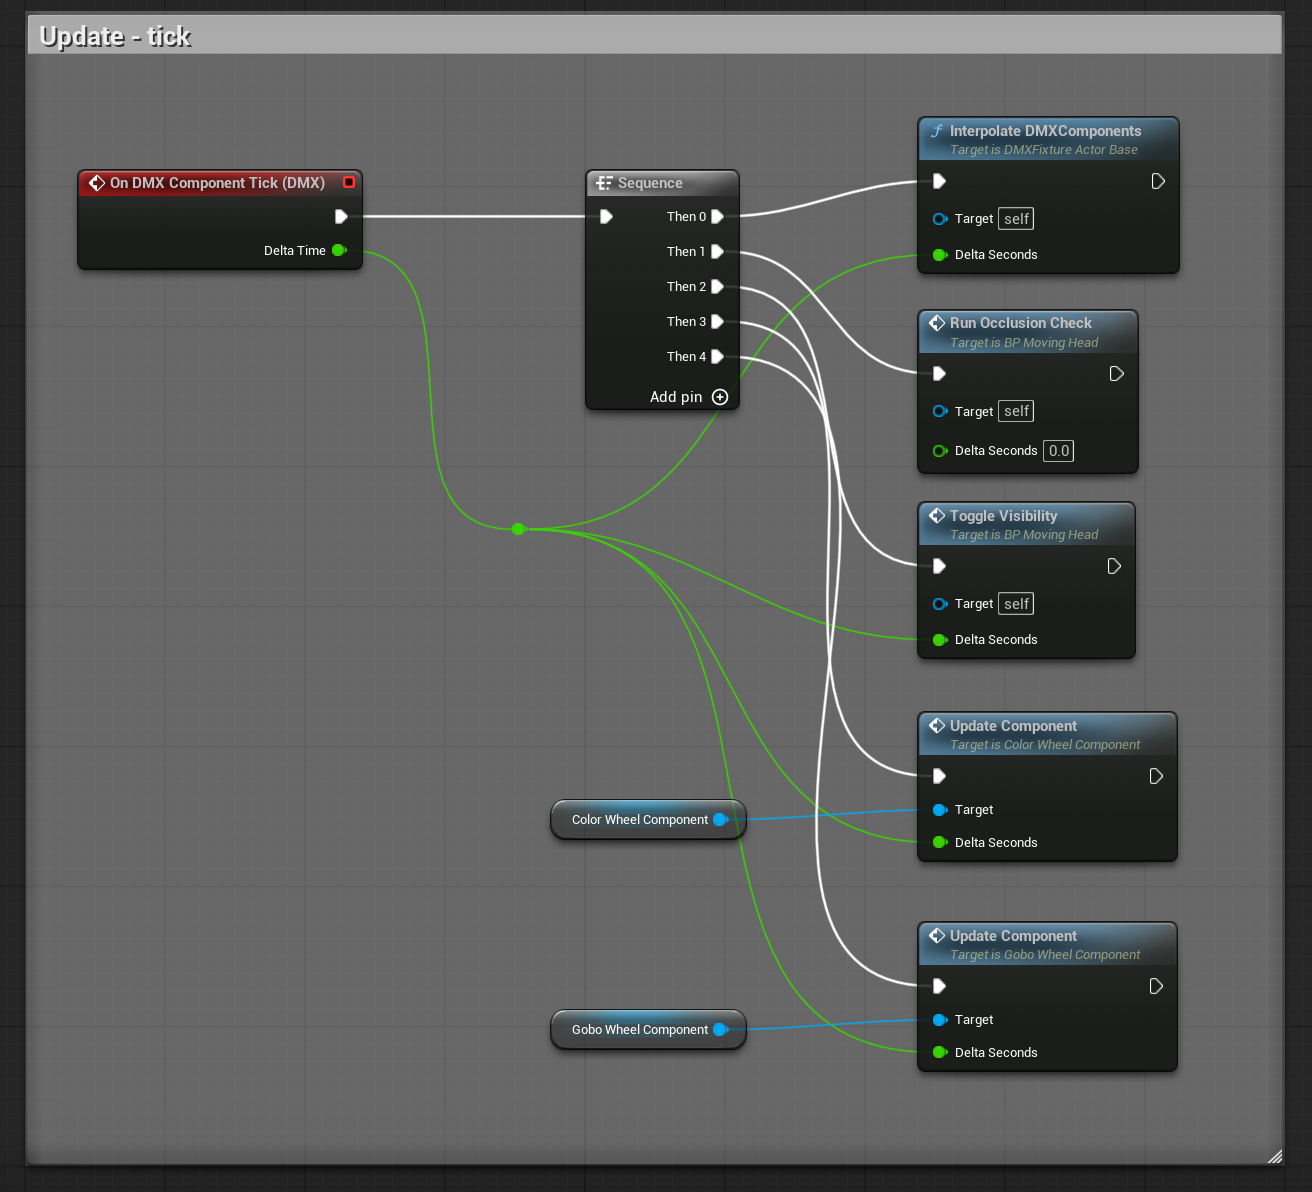
On DMX Component Tick runs constantly — every game frame, at all times. It does not correspond to receiving a sACN or Art-Net signal from a console. It ticks simply because the DMX component exists inside the fixture and the fixture is in the level.
Things that must run every frame regardless of whether a DMX value changed:
- Interpolate DMX Components — runs across all components present.
- Run Occlusion Check — shortens or eliminates the beam if an object is in the way. Full occlusion is handled here; partial beam occlusion is currently in development, though it will be performance-heavy.
- Toggle Visibility — hides components that are not in use.
- Update Color Wheel Component — required because the color wheel can spin continuously through colors.
- Update Gobo Wheel Component — required because the gobo wheel can spin, and the beam, light, and lens can rotate independently.
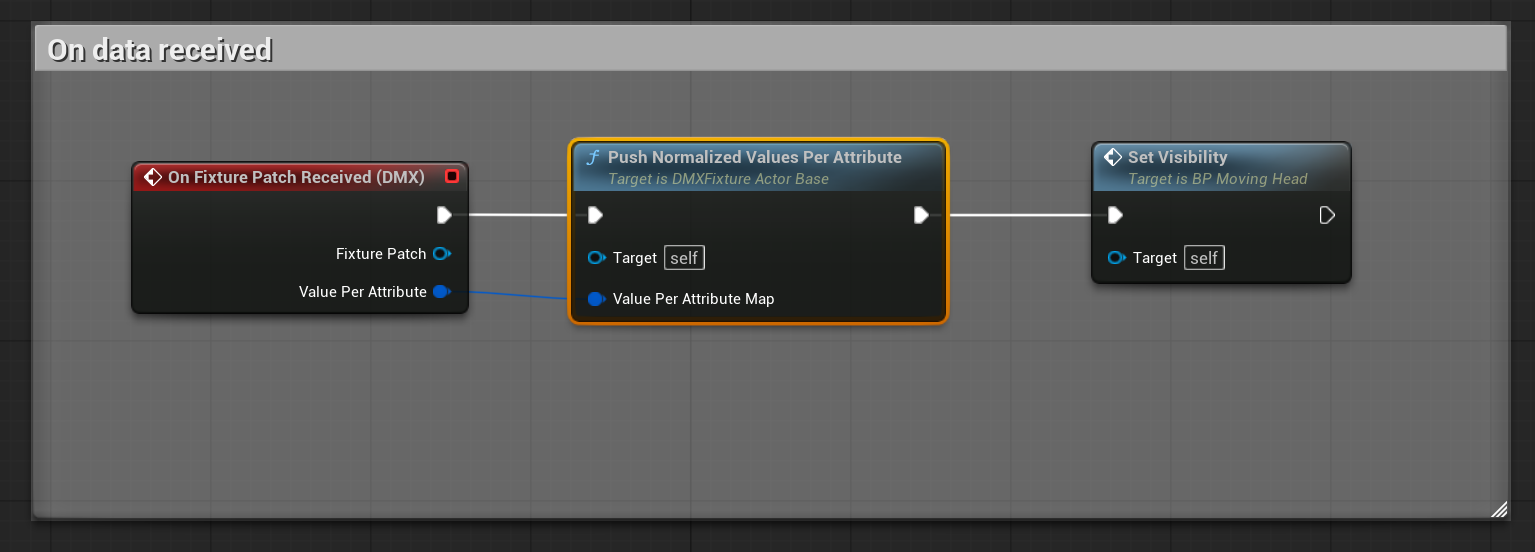
On Fixture Patch Received
Below the tick logic in the graph are functions that only run when a value changes. The On Fixture Patch Received event pin only fires when a value relevant to that specific fixture changes — not every frame.
The logic here pushes normalized values per attribute — presumably to the components inside the fixture — only when something has actually changed.
Inside a Component: Dimmer
Let's take a look at one of the components — the Dimmer Component.
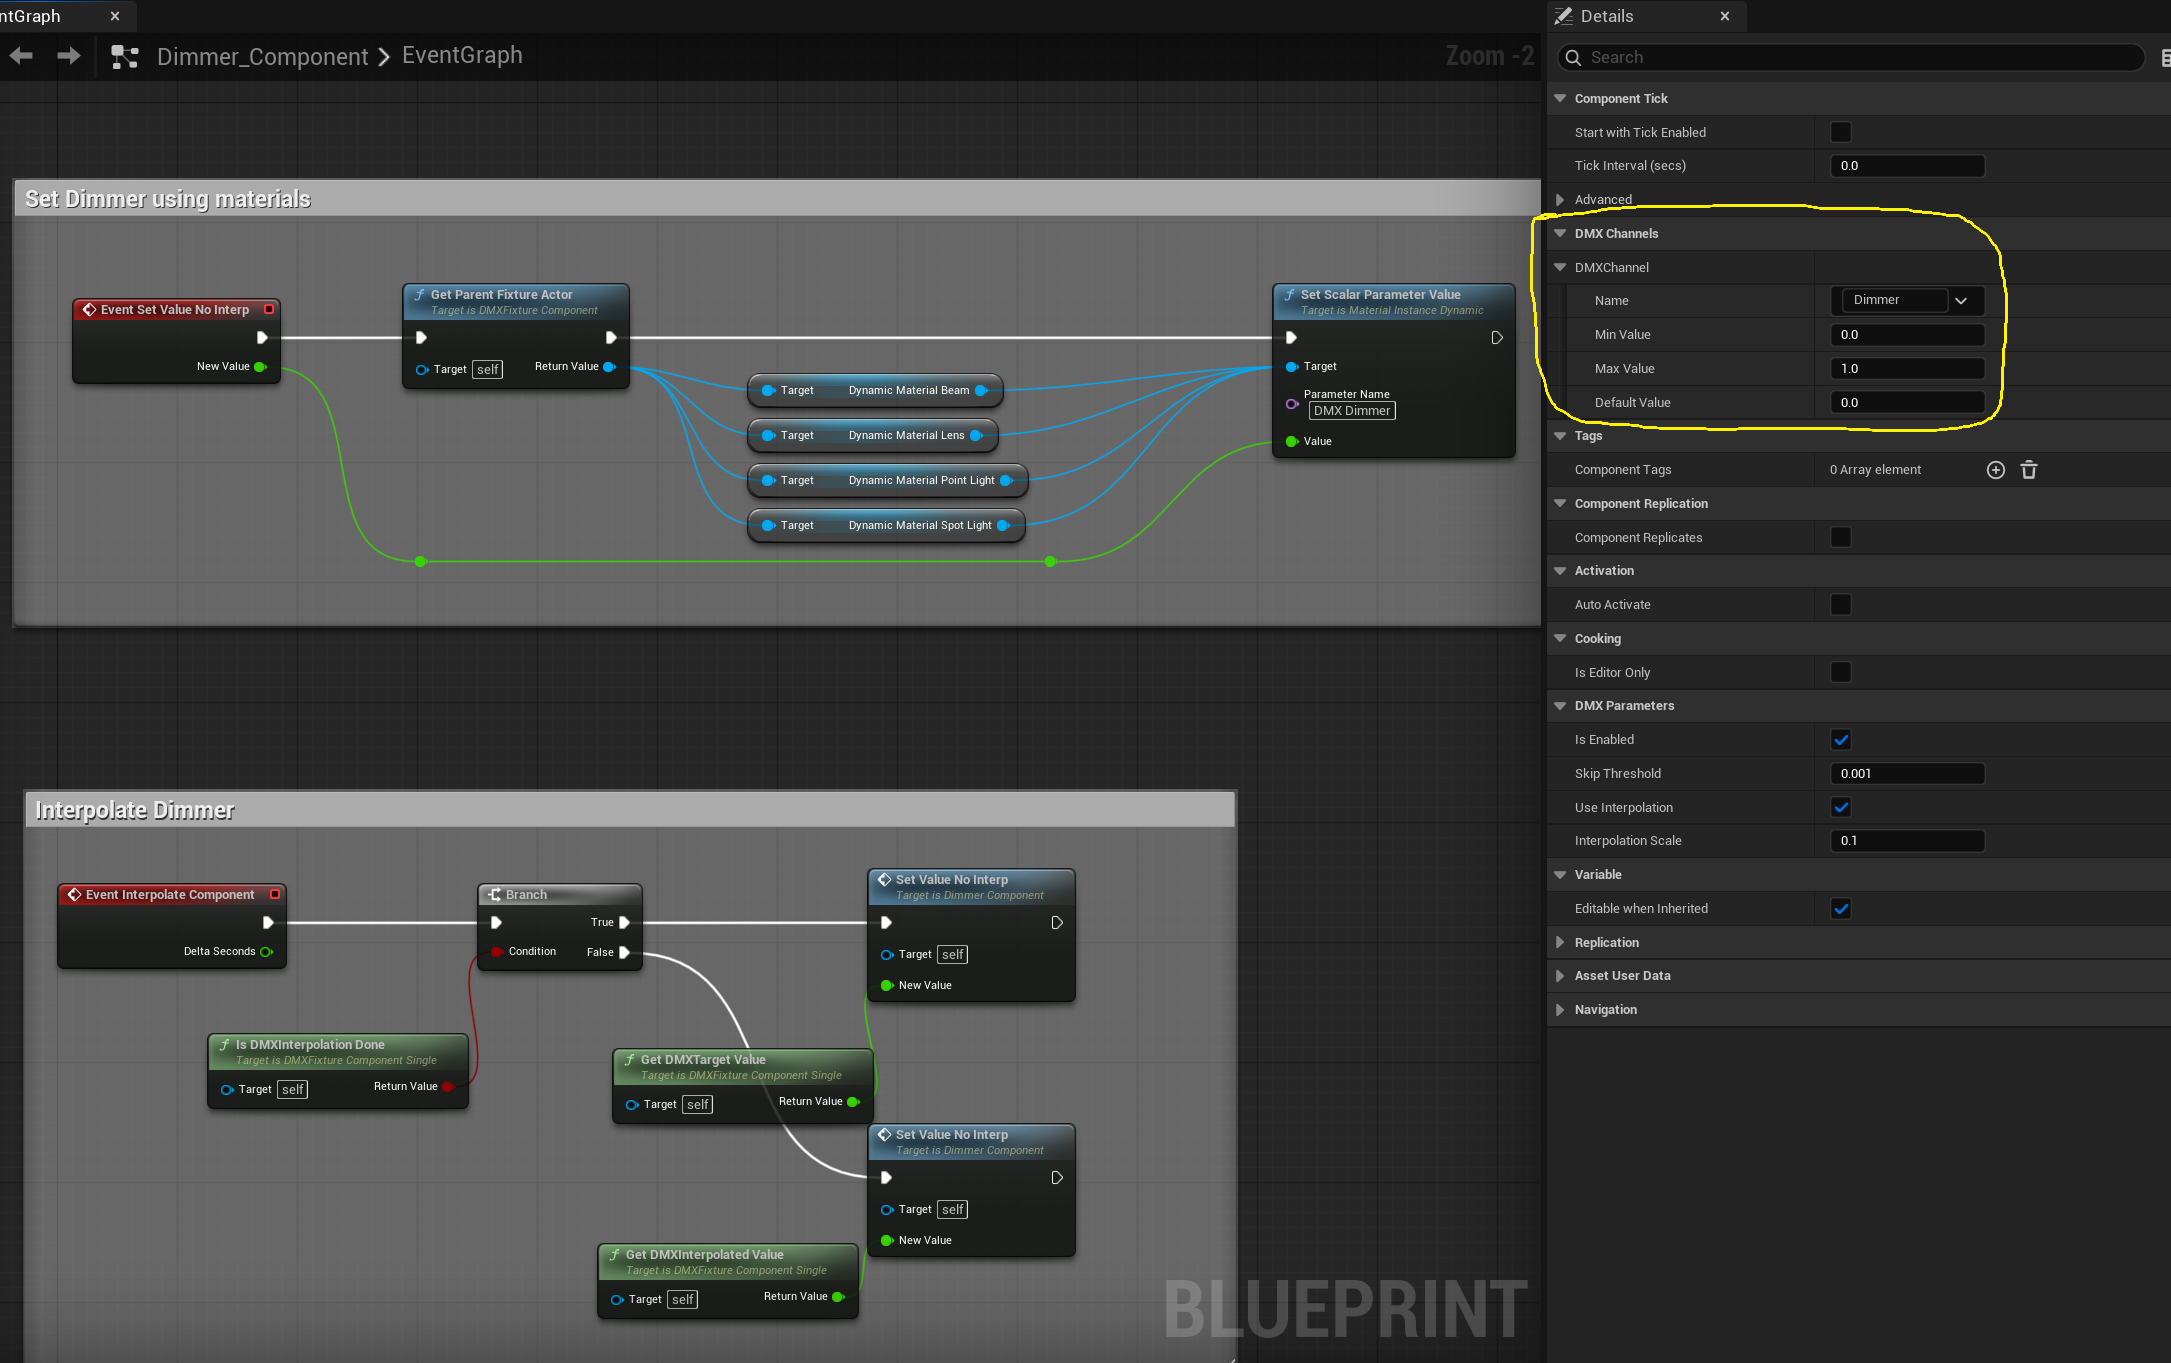
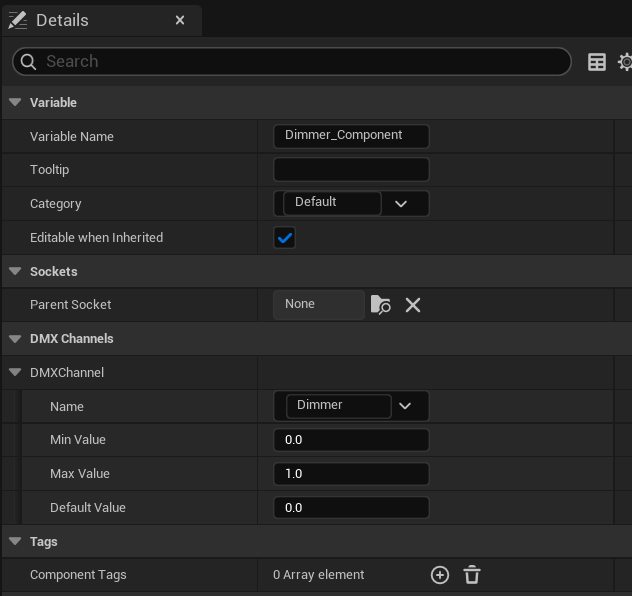
This component takes its input from the host fixture's attribute map, using the attribute name specified by the Name field under DMXChannel in the Details panel of this component.
The component also contains its own logic. What you are seeing is the default method of retrieving critical references from the parent — or hosting — fixture actor.
Getting References from a DMX Fixture Actor
The good news for custom Blueprint writers is that once you have a reference to a DMX Fixture Actor, you can always retrieve the following:
- Dynamic Material: Beam
- Dynamic Material: Lens
- Point Light — exists in the class but does not appear to do anything
- Spot Light
- Spotlight Component
- Yoke, Head, and Base
These are all default variables on the DMX Fixture Actor class, making them reliable references in any component. You can use them to drive things like DMX Dimmer, DMX Color, gobo textures, strobe parameters, and more.
Casting to a Custom Fixture Class
If you add your own variable to a custom Blueprint, it will not be available through the standard Get Parent Fixture Actor node — that only exposes the base class. However, if you add a branch that checks whether the parent fixture actor is a specific class, and if so casts to it, you can retrieve any variable defined in that custom class.
For example: if you create your own DMX Fixture Actor and call it MyCoolFixture, a component can call Get Parent Fixture Actor and retrieve all the standard references. But to access variables unique to MyCoolFixture, you would need to cast to that class first — as shown below.

The Dimmer Component Inside the Parent Blueprint
When you select the Dimmer Component from within the parent Blueprint, the same Details panel is visible — because those variables are marked Private = false. From here you can change the DMXChannel Name to look for a different attribute.
The component will find its DMXChannel name — or multiple names — and pass the corresponding value into the component to execute its code.
Use the dropdown arrow on any Attribute Name field to browse available names, or double-click inside the text field to type your own — both in the Fixture Library and on the receiving Blueprint. Names must match exactly: case-sensitive, no trailing spaces.
Each component is like a specialized chef — looking for specific ingredients from the attribute map and performing one task. Changing a chef's ingredient list changes what it responds to, but the recipe stays the same.
Building Your Own Fixture Blueprint
The other method of building logic inside a fixture is to create your own Blueprint that retrieves the attribute maps inline. This is how my multi-instance fixtures are made — they behave so differently from one another that I prefer to have a unique recipe for each fixture. Attempting to modularize something this complex may be possible, but it is not the approach I use.
Starting from Scratch
Right-click in the Content Browser and create a new Blueprint from the DMXFixtureActor class. Using this class means the fixture will be available for MVR export. This class already includes a DMX component by default. If you are building from a different base class, you will need to add a DMX component manually.
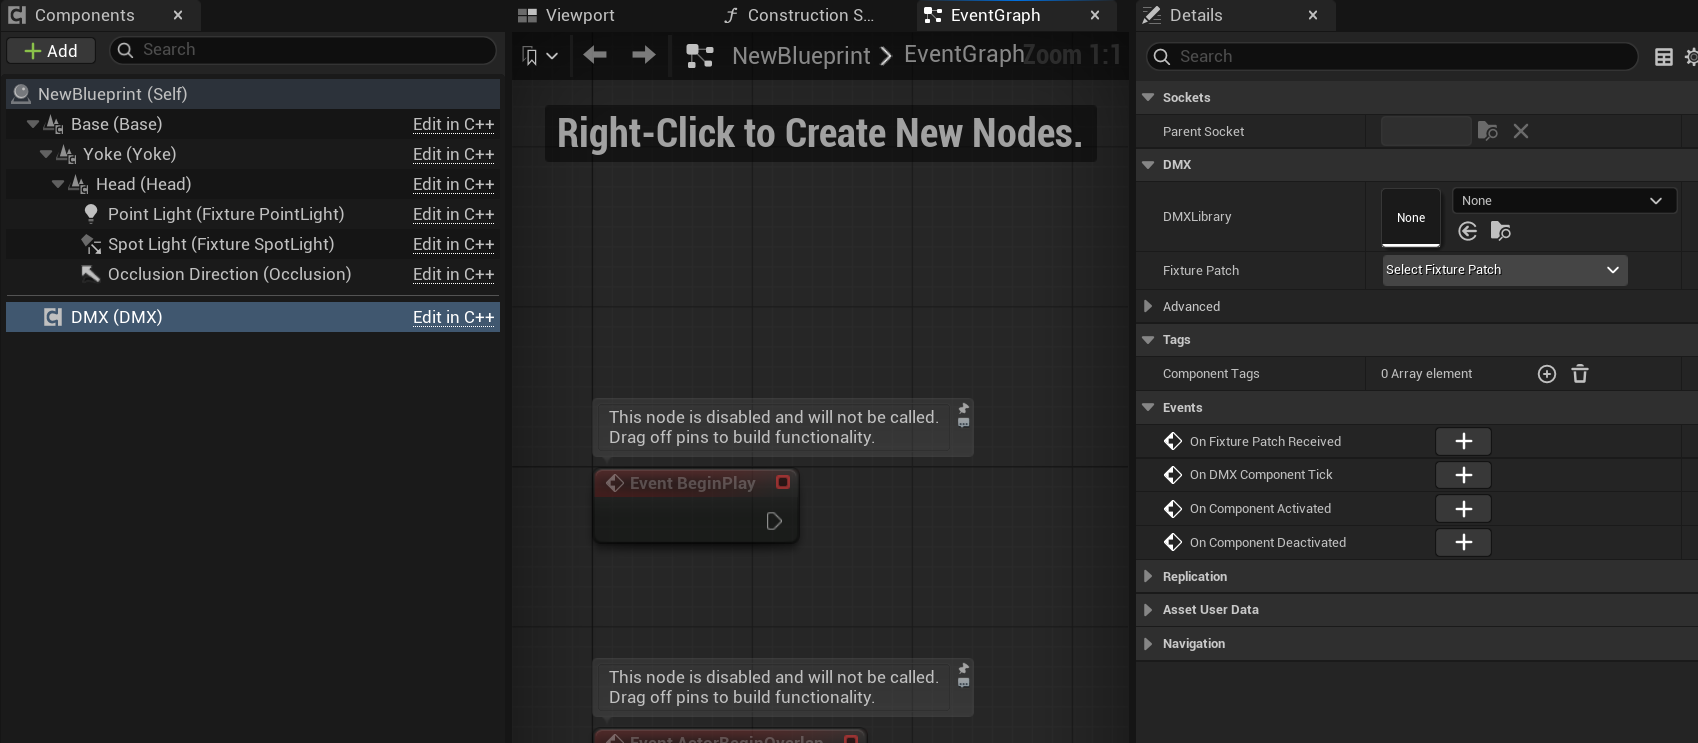
Wiring Up the Event Graph
From this Blueprint's Event Graph, click the DMX component. In the Details panel you will find the following event pin nodes:
- On Fixture Patch Received
- On DMX Component Tick
- Two additional event pins
On Fixture Patch Received and On DMX Component Tick are the two used most commonly.
The DMX component does not have to live inside a light or anything lighting-related. If you need any object to run functionality inside the editor without entering Play Mode, adding a DMX component is a great way to inject a working event pin to do whatever you need.
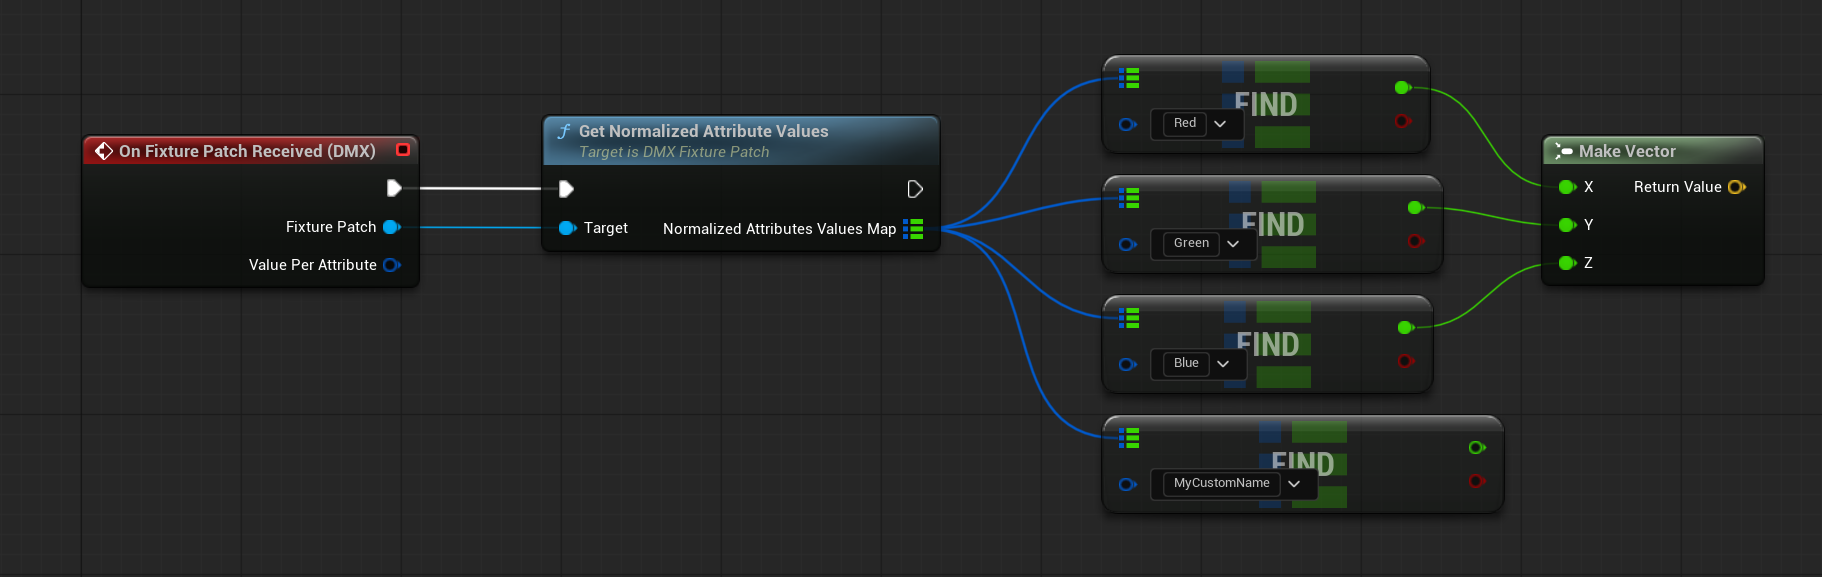
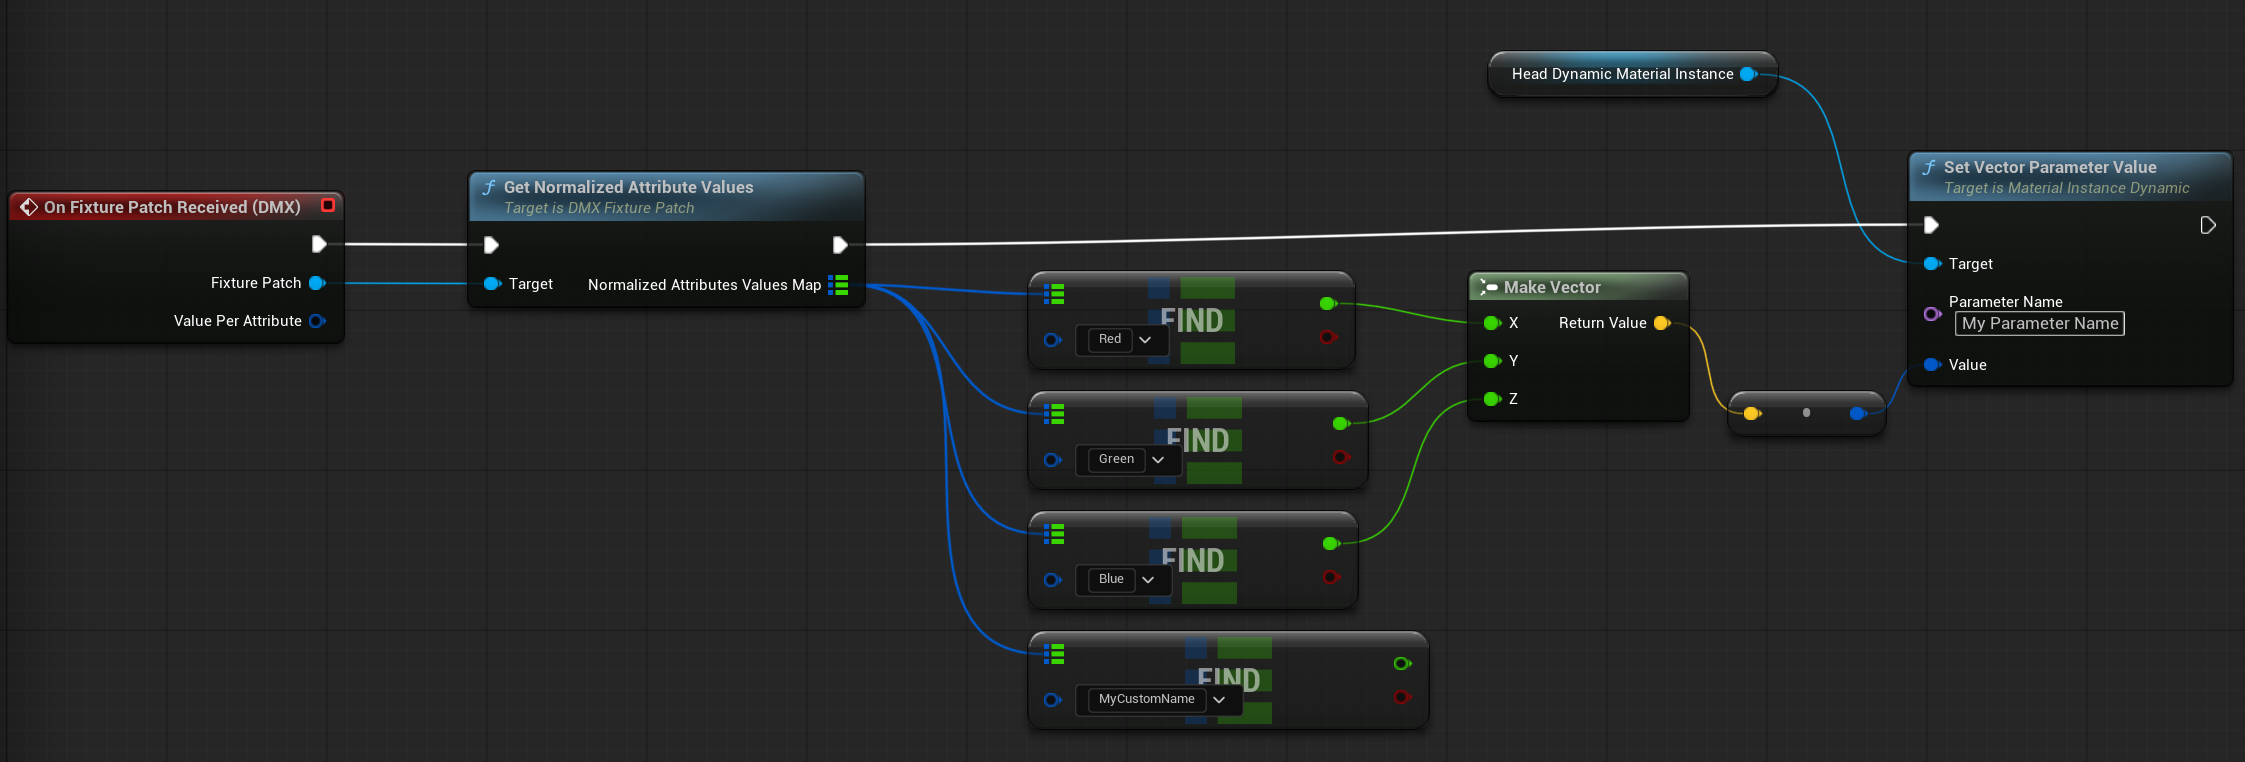
Reading Attribute Values Inline
Once you place your On Fixture Patch Received node, drag out from the Fixture Patch pin and search for Get Normalized Attribute Values. This returns a structure. Right-click the output pin and select Split Structure Pin to expose the Normalized Attribute Values Map.
From there, drag out from the map and add a Find node. You can then look up any predefined or custom attribute name and retrieve the value associated with it. What you do with that value from here is entirely up to you.
This self-contained approach is like one chef handling everything in the kitchen — no modular specialists, just a completely custom recipe that can be changed without other chefs getting in the way.
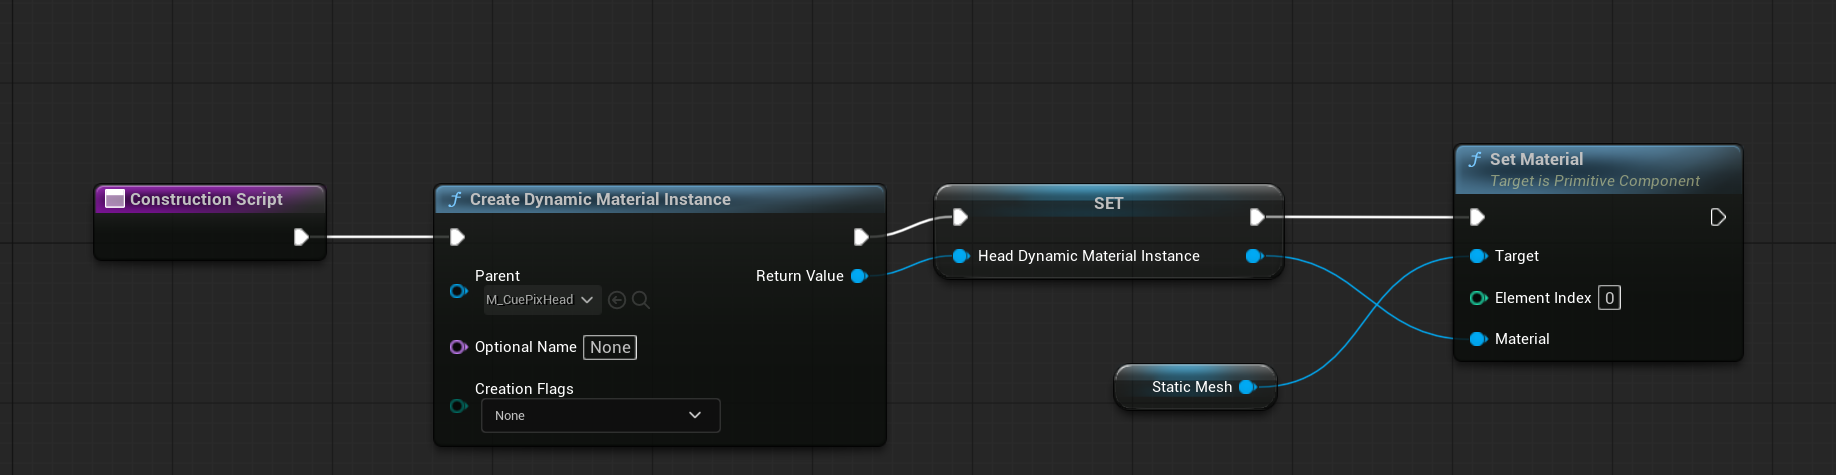
Working with Material Instance Dynamics
My earlier approach was to apply a material directly to a mesh and then drive a scalar or vector parameter on that material. This does create a Material Instance Dynamic under the hood — but with no reference stored, there is no reliable way to track it or share it across multiple elements.
For example, in the Prism component — available exclusively in the 1M Lights fixture pack — the same beam material needs to drive multiple beams simultaneously. Without a stored MID reference, that is not possible.
The better approach is to build the MID explicitly in the Construction Script: create it, store it in a variable, and then reference that variable whenever a parameter needs to be applied. This gives full control over the MID and makes performance easier to manage, since Unreal Engine handles MIDs that share the same source material more efficiently when they are tracked.
The Full Family: Assets That Make It All Work
Now that we understand the core process of how data flows from a console, through the DMX Library, and into Blueprints, it is time to see where that data gets applied. Let's meet the entire family.
Master Materials
/DMXFixtures/LightFixtures/DMX_Materials/Masters
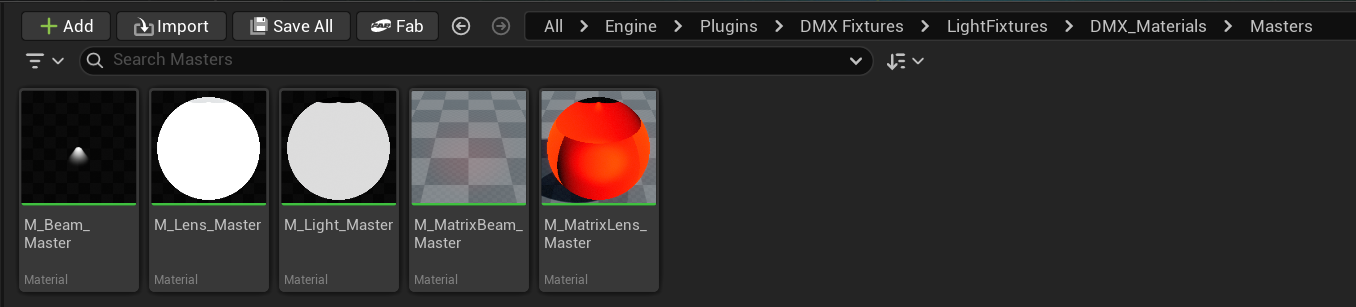
- M_BeamMaterial — A complex material with many parameters, applied to a static mesh beam — essentially a cube with no top and normals facing inward.
- M_LensMaster — The material assigned to the lens of a moving head. It appears glass-like, can light up, and accepts a gobo. In the 1M Lights plugin, framing shutter functionality has been added to this material.
- M_LightMaster — A light function material that takes a gobo texture, strobe function, and dimmer function to output a correct light. Framing shutters have also been added to this in the 1M Lights plugin.
- M_MatrixBeam — A simpler beam made of planes, used when many LED cells of a matrix fixture are close together. Fairly unresearched on my end.
- M_MatrixLensMaster — Nearly untouched, as multi-instance fixture lenses are built from scratch per fixture in the 1M Lights plugin. This material likely handles different coordinate-based colors from a Matrix Attribute Map, which will be covered later.
Material Functions
/DMXFixtures/LightFixtures/DMX_Materials/MaterialFunctions
A Material Function is a reusable chunk of material logic that can be inserted into any material. When you find yourself copying the same nodes more than once, a Material Function lets you build it once, expose parameters, and reuse it cleanly — saving code, improving performance, and keeping the node graph readable.
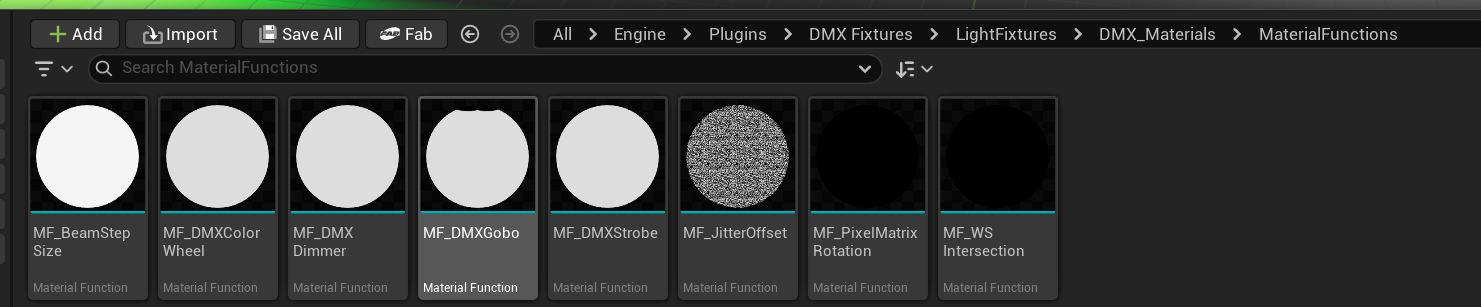
The Material Functions used most commonly:
- MF_DMX Gobo — Upgraded in the 1M Lights plugin to handle 3 gobos and framing shutters. A fundamental part of all moving spot and profile lights.
- MF_DMX Dimmer — Used alongside a Dimmer component. Not used on multi-instance fixtures.
- MF_DMX Strobe — Can be placed inline right before a material connects to the Emissive output. With some adjustment, it can make almost anything strobe.
Components
/DMXFixtures/LightFixtures/Components

These are the same components found inside a standard moving light Blueprint.
Data Tables
/DMXFixtures/LightFixtures/EffectTables
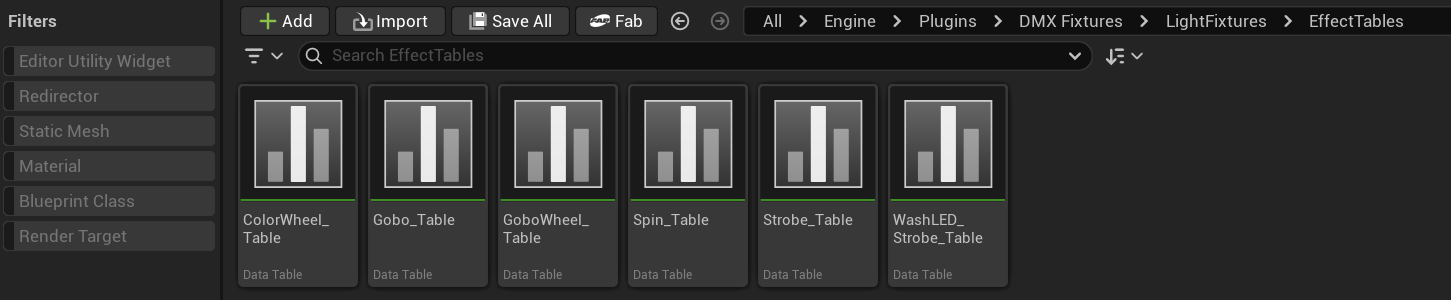
Some components rely on data tables. The base versions of these tables are found here. Each table follows a specific structure — typically defining a row name, DMX value from, DMX value to, effect value from, effect value to, and any object reference needed for that row. The DMX values in these tables are not normalized — they are either 0–255 or 0–65535 — which is where Get Attribute Values (Not Normalized) comes in.
Structs
/DMXFixtures/LightFixtures/Structs

The data structures that define the row format for the data tables above can be found here.
Tools
There is also a Tools folder, which allows a user to bake a color disk or a gobo disk by selecting various colors and gobo textures. I have attempted to use this and discovered some issues that I did not pursue further — given that I have built my own version of these tools, which parse a GDTF description file (or soon, a full GDTF file directly) to generate the necessary textures automatically. These can be found and downloaded for free here: patreon.com/posts/158709440
Enumerators
/DMXFixtures/LightFixtures/Enums
The enumerators for some of these structures can be found here. These are predefined action types that each data table row can be assigned to — strobe rows have a shutter output type, gobos can have Swap, Spin CW, or Spin CCW, color wheels can Swap or Spin, and so on.
An enumerator is a predefined, indexed set of named options — great for representing a limited set of outcomes without using strings or bare numbers.
Meshes
/DMXFixtures/LightFixtures/Meshes
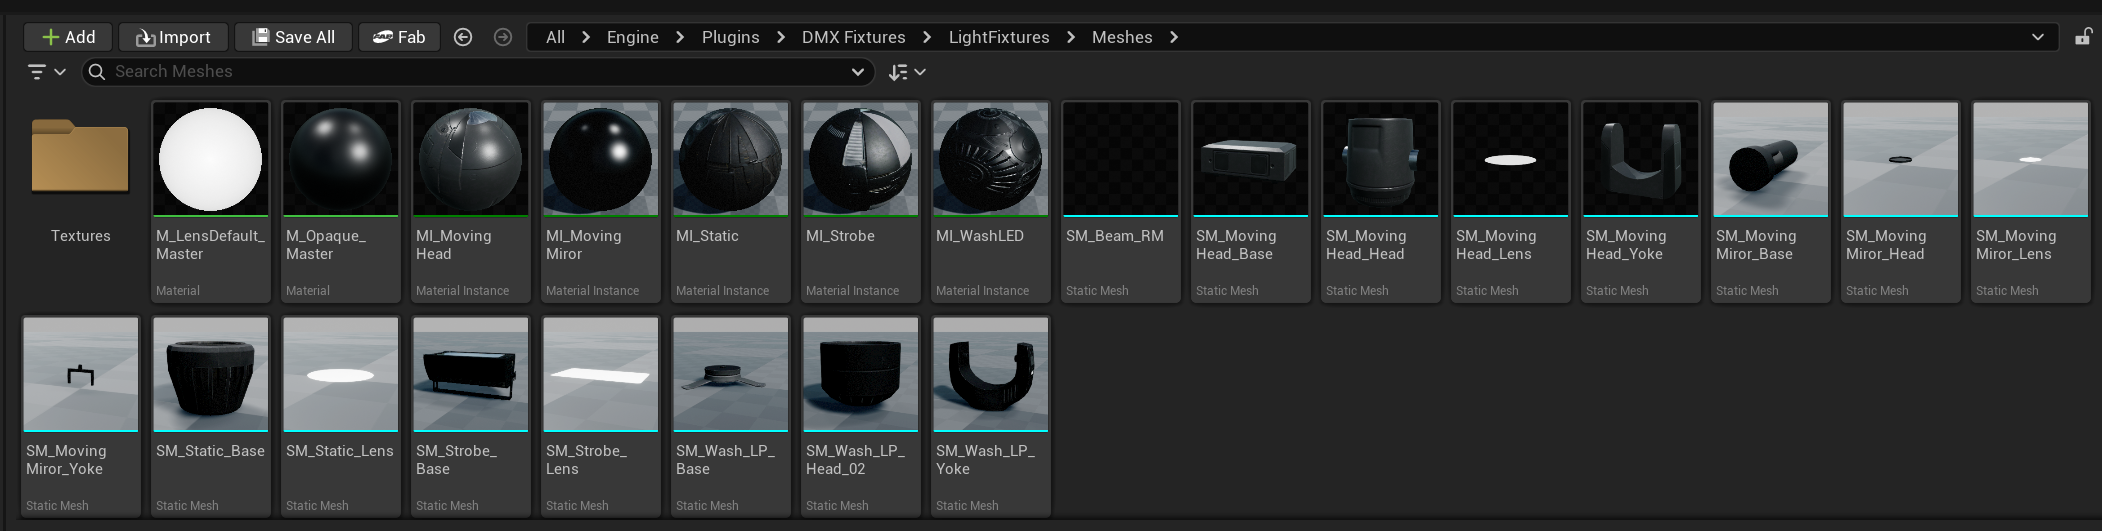
These are the meshes that make up the basic DMX fixture class. The modular mesh here that can be applied to any fixture is SM_Beam_RM — this is the mesh that the beam material gets applied to, and it can be reused across multi-instance fixtures.
The static mesh beam and beam material combination is not limited to DMX fixtures — it is already a common game development technique, and this is simply a beautiful, premade version of it.
DMX Matrix
Let's return to the DMX Library and its core function — reading the DMX stream, applying the fixture patch to that stream, copying values to attribute names, and packaging those attribute names alongside their values in a map for the Blueprint to receive.
There is another important function the DMX Library can optionally perform, or perform in place of standard attribute names entirely — and that is a Fixture Matrix.
What Is a Fixture Matrix?
A Fixture Matrix is like a set of attribute names with one additional parameter: cell coordinates. Every fixture profile is allowed to have one Fixture Matrix.
The Fixture Matrix is positioned at specific channel numbers within the fixture profile. The DMX Library will work through its standard attribute list as normal — packaging each value alongside its attribute name in the attribute value map. But once it encounters a Fixture Matrix, it suspends placing standard attribute names and values in the attribute value map, and begins packaging a new, separate map: the Matrix Value Map.
Let's observe this animation of an Ayrton Magic Blade FX. In the profile, there are normalized attribute values, and matrix cell values. Press Play below to play the animation.
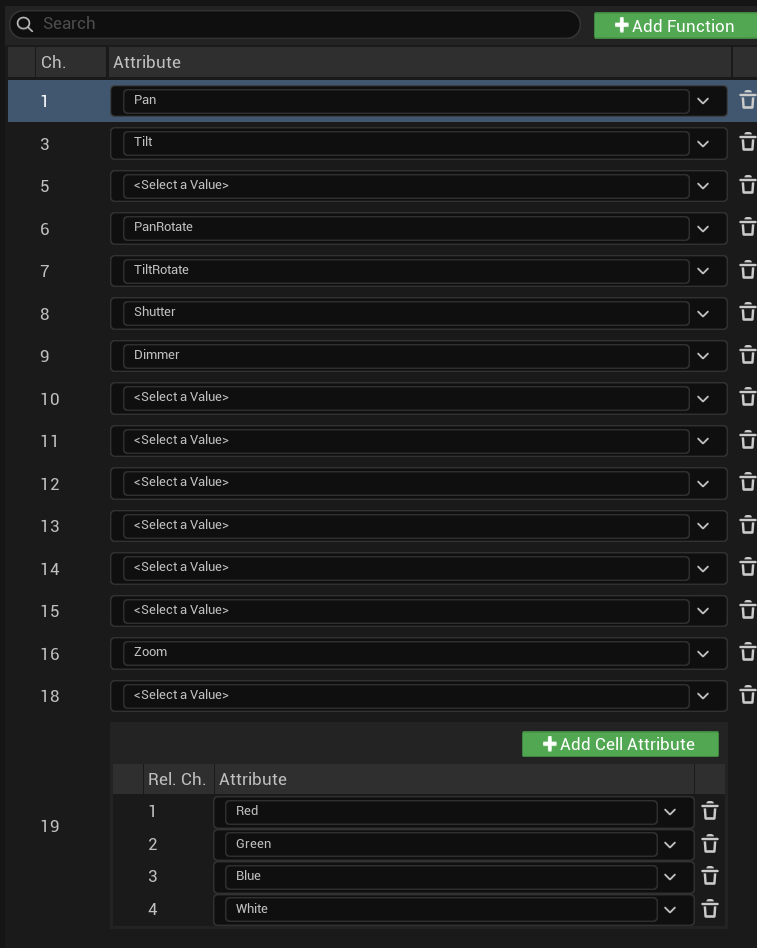
The normalized cell values are packaged in the Normalized Value Map, and the Matrix Cell Values are packaged in a Matrix Cell Map. The Normalized values can be called with simply a Find node, but the Matrix Cell values must have a cell coordinate specified in order to return a Matrix Cell Value Map.
In the code snippet below, we can see how to implement getting matrix cell values.
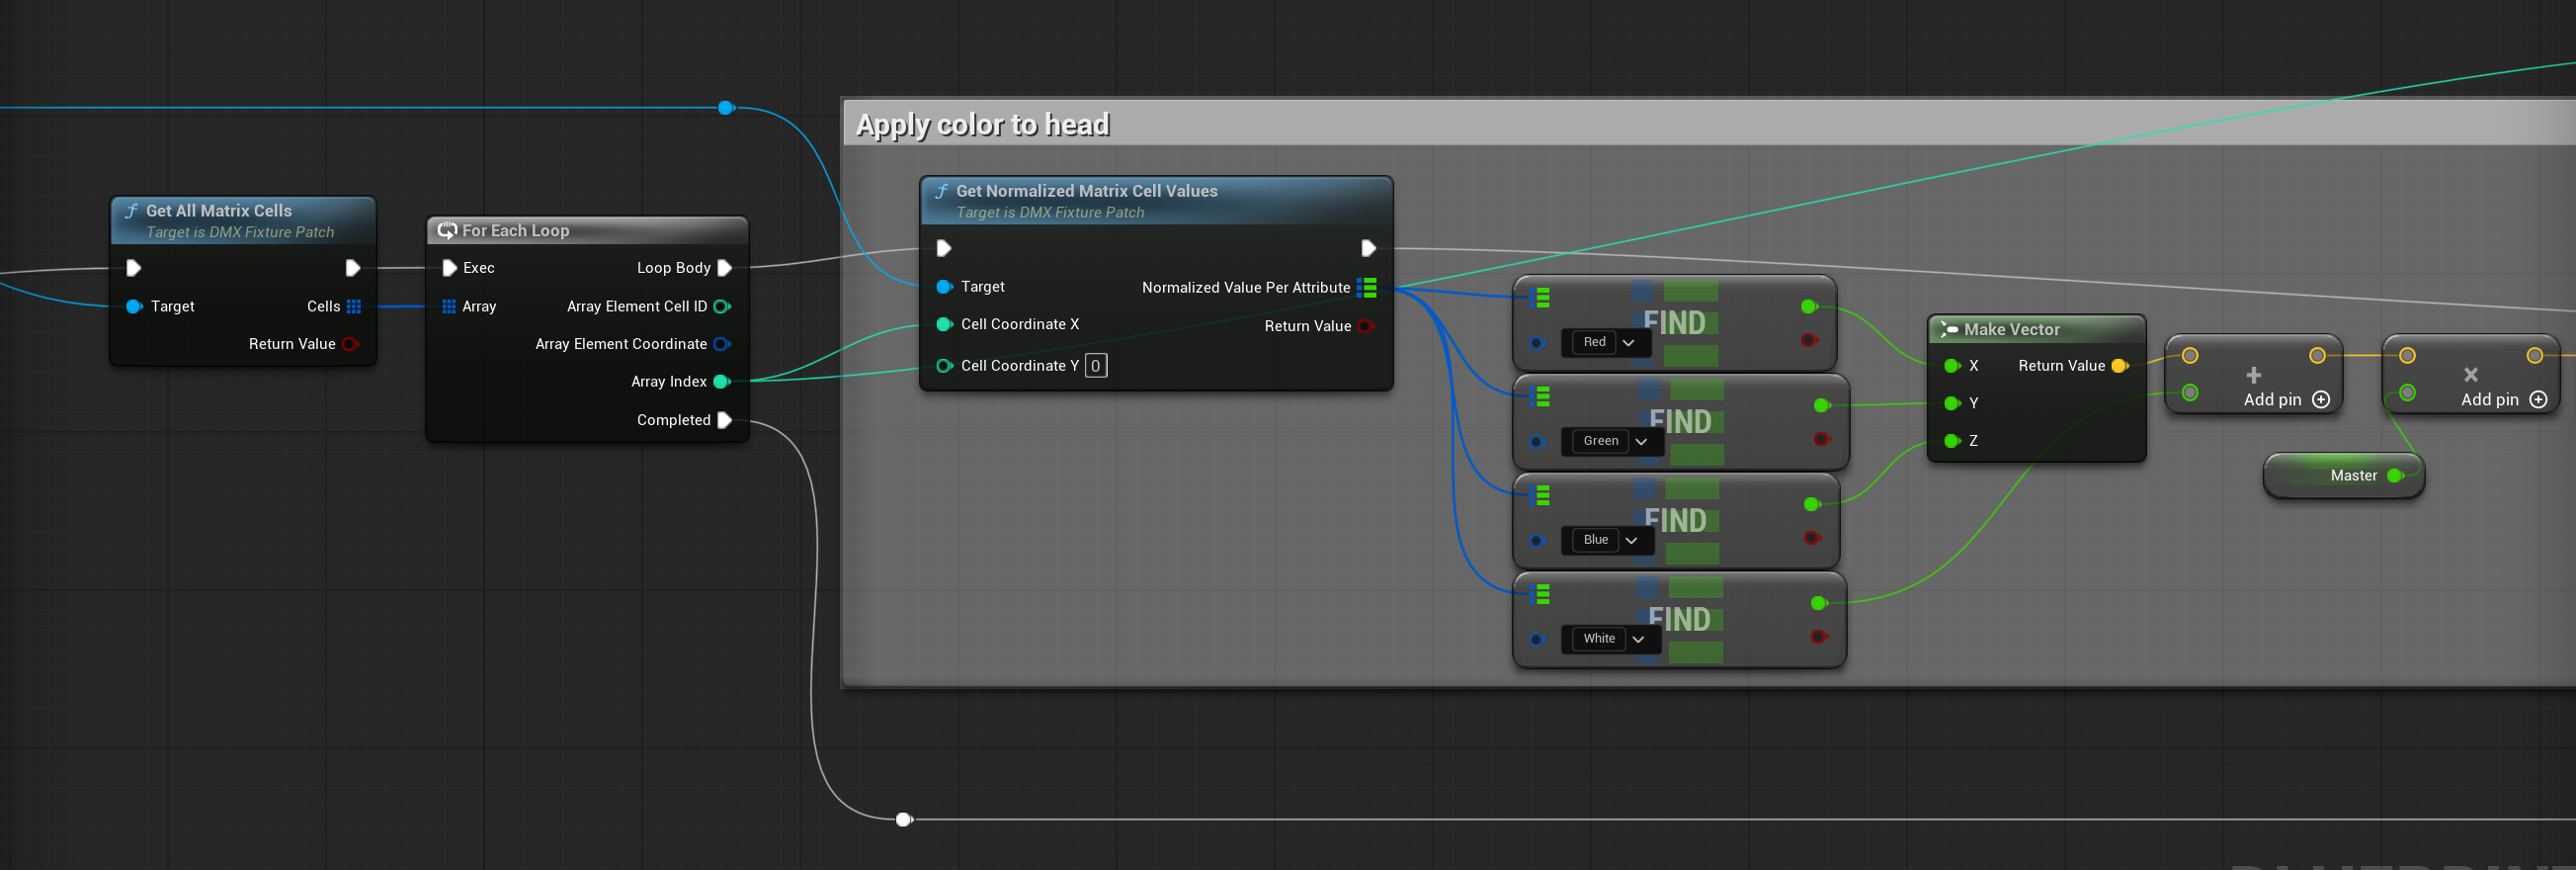
Note that in the above screenshot, array index is used instead of cell coordinates. Either would have worked — I simply wanted to reduce the number of calls that took place. Did it improve performance? I have no idea. Did it work? Absolutely, and I haven't touched it since.
Once again, past here, it is completely up to you on how to implement this. Personally, I like to create a material for my head, with the number of vector parameters matching the number of instances. From the fixture blueprint, I set the vector parameter value of the Material Instance Dynamic of the head, with the array index being the instance number — just a straight 0–6 in this case for 7 instances, as this avoids any string appending taking place.
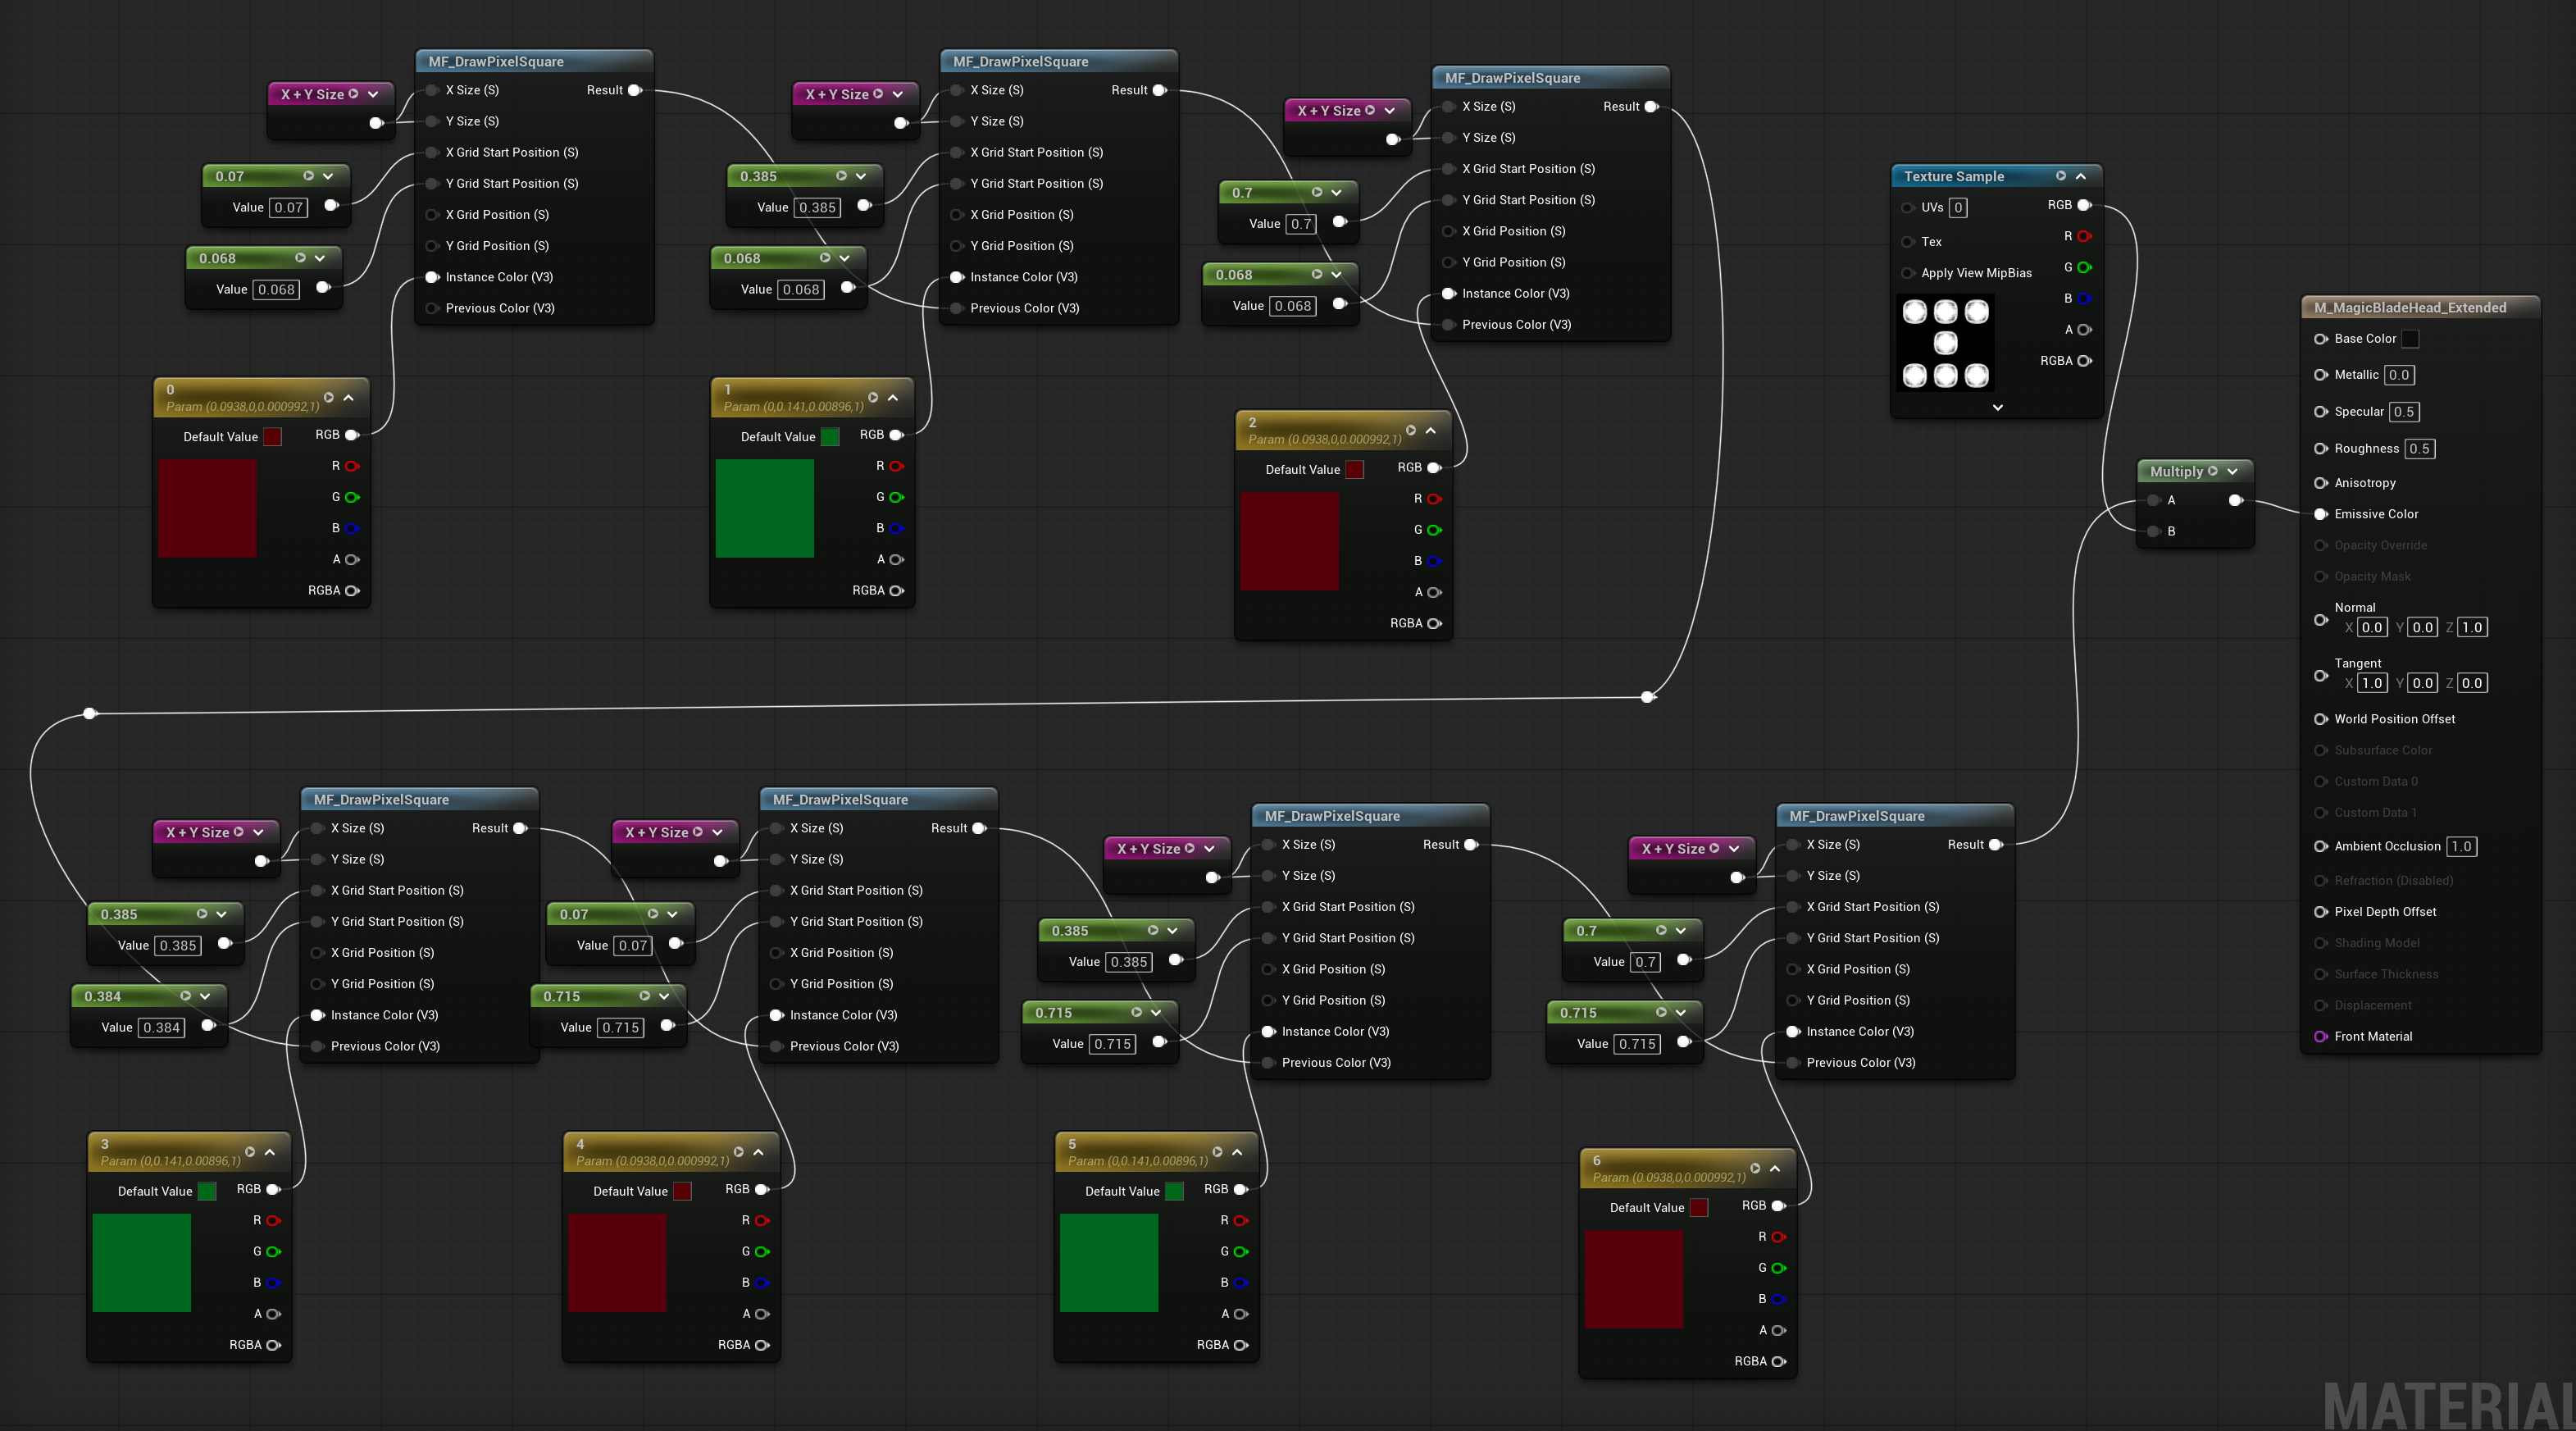
I then have a material function to draw a square — I've provided this blueprint below. Using this method, I can procedurally generate the colors and pixels that are lit, and multiply the end result by a baked lighting texture of all the cells lit, just once — rather than my old method of taking one cell lit, with lighting baked, and offsetting that texture a number of times.
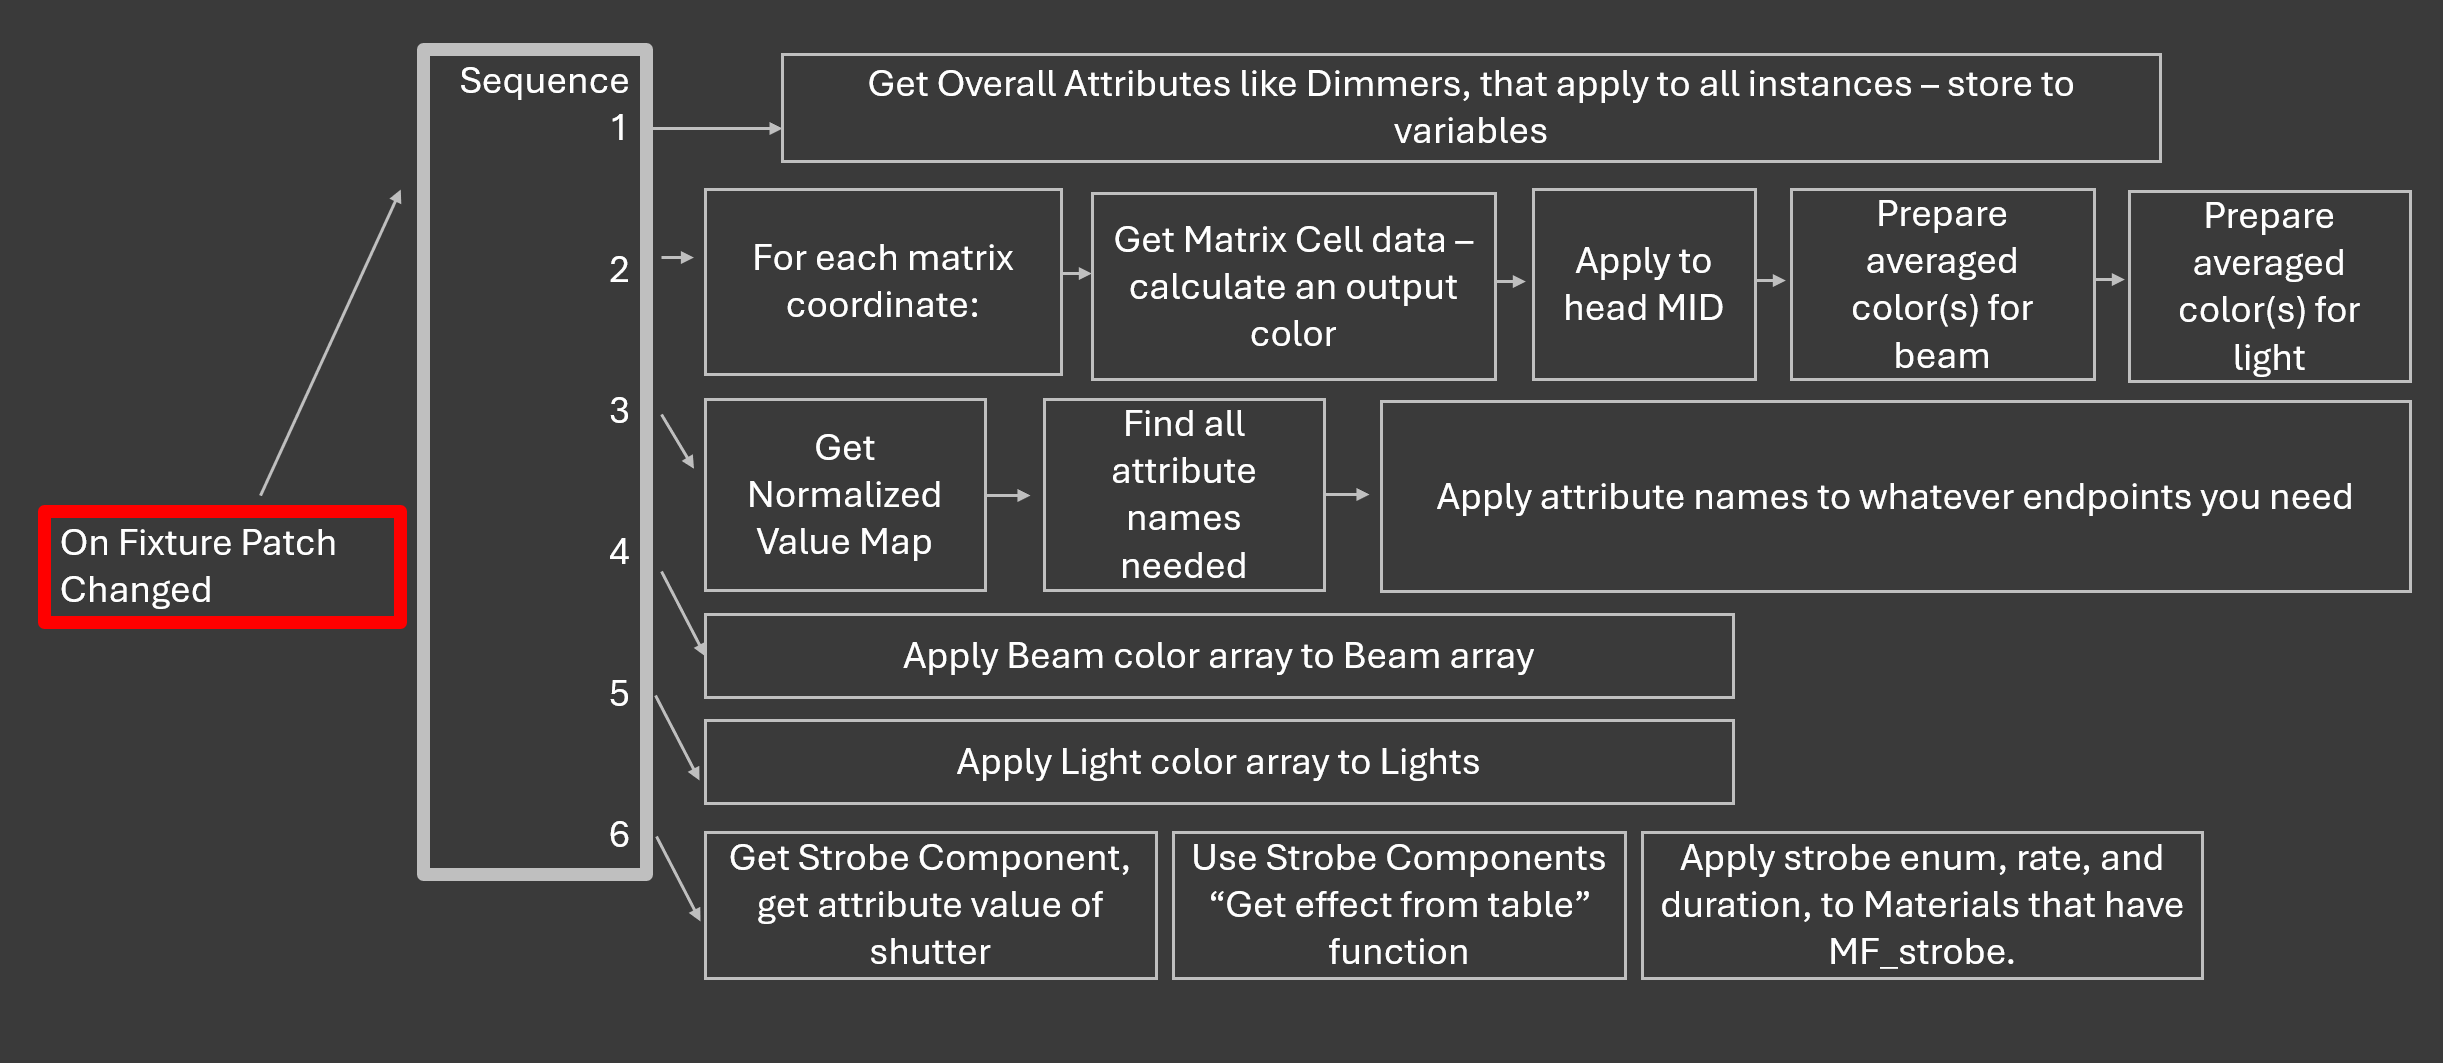
Overall, this is my workflow to hit everything needed on a multi-instance fixture:
Get all of my overall attributes needed for the fixture — usually dimmers, sometimes RGB dimmers, white dimmers, etc. Those will be multiplied by each matrix coordinate's end color if the fixture uses it.
Iterate through all of my matrix cells. I apply the cell data right away to the head — but almost always do some averaging so that I don't have as many beams or lights as I do instances, to lighten performance. These averages usually must be stored as a variable in order to average them, so I don't apply them right away.
I am assuming that doing the extended math to average them on the spot carries less overhead than storing an array of vectors, then averaging the array of vectors. I could be wrong here though.
I handle all necessary values on the Get Normalized Value Map, and apply them to their endpoint.
Note: I do have a practice of only storing to a variable if it's needed. I have tested this, and storing every vector output color to a variable — then calling that variable to apply the color — carried a significant performance drop, roughly 5 frames per second across only a few fixtures, opposed to drawing long wires across the blueprint to apply a vector color straight from its source.
I then apply my beam color to my beam MID.
Apply light color to my light — color cannot be applied to a light function. It must be applied to the actual light color.
I do place a strobe component in my multi-instance fixtures so that I can create a data table for strobe effects. I use the strobe component's function "Get Effect From Table" and apply the resulting strobe enum, strobe rate, and duration to the necessary MIDs — head, light function, and beam.
That's a Wrap
That's all for this tutorial — but if you found it helpful, here are a few ways you can support me and help keep this content going.
YouTube
youtube.com/calebhoernschemeyer — Subscribe and see what other tutorials are available. A subscription and even one additional video view goes a long way for visibility, and helps me work toward monetization so I can accelerate tutorial output.
Patreon
patreon.com/calebhoernschemeyer — If this tutorial was useful to your career, consider a contributor subscription. Just $5 a month helps me commit more time to tutorials, advice, and community projects like this one. To be clear — a subscription is simply a way of saying thank you, not a requirement to get my time. I will be available to chat regardless of Patreon status. If you couldn't tell from the work put into this, I genuinely love teaching.
Discord
discord.gg/HKZb2yJse3 — Join a community of people using Unreal Engine for DMX control. Chat with me, other users, ask questions, or show off your work.
Thank you for using this tutorial!